

Internet connection
Depending on the structural requirements, we provide your residential estate with either network cable (LAN socket) or coaxial cable (TV socket).
network connection / LAN socket:
If you are using a LAN socket, please note that if you have more than one socket port in your apartment, not all of them will be connected to the Internet. If you are unable to establish an Internet connection, please first try another port at the LAN socket.
coaxial connection / TV socket:
If you are using a TV socket, we will provide you with a cable modem in your apartment. Depending on the type of TV socket, the coaxial cable is either connected directly to the socket or to a splitter so that a TV set can be connected in addition to the Internet.
Device configurations:
With both variants, your devices must be configured so that they receive their IP and DNS address automatically (DHCP). Instructions for these settings can be found here in our FAQs. This also applies to your router, which must also be configured for DHCP. Please have a look at the user manual of your router.
Internet connection activation:
If your device is correct configured and connected to the network socket or cable modem, please open the browser (firefox/chrome etc.) of your operating system. You will be redirected to our web portal for activation. If you are not automatically redirected, you can also reach the web portal manually: https://activation.my-wire.de (The URL only works within the dormitory network!) After activation, you can use the Internet without restrictions. (Please note that Apple iCloud Relay, VPN software as well as proxy settings may prevent the activation page from opening. Please turn off these services temporarily.)
Use of multiple devices:
If you should change the device at our connection, a new activation is necessary. In the case of a connection via a cable modem, it is also necessary to disconnect the cable modem from the power supply for a short time. If you want to operate several devices, we recommend that you use a router. After activation via a router, it is registered with us. All devices connected via this router can then use the Internet without activation. We can recommend the TP-Link Archer C80, which you can order here: https://amzn.to/3STTDx8 (Payed Link*)
Note: Please handle the connecting cables carefully. Kinking and bending of the connection cables can cause damage, which can result in a failure of the Internet connection.
*) As an Amazon partner, we earn money from qualified sales.
Last updated on 31. Jan 2024
If you receive an error code on the website https://activation.my-wire.de, please tell us the error code including your address and full room number.
If you have received a cable modem from us:
- Is the standby LED on the modem lit? If yes, please press the standby button to return the modem to operating mode.
- Restart the cable modem by disconnecting it from the power supply and reconnecting it.
- Do the LEDs Power, Receive (DS), Send (US) and Online light up continuously? In this case, everything is OK with the cable modem. Check the settings on your devices.
- If you are using a router, please remove it and connect your device directly to the cable modem via LAN to ensure the function of the connection. Restart the cable modem by disconnecting it from the power supply and reconnecting it. If this results in an Internet connection, please check the settings of your router and reset if necessary.
- Please test a different LAN cable between your device and our modem as a faulty LAN cable may cause the malfunction.
- If the Power LED does not light up or Receive (DS) or Send (US) are flashing, please check that all cables are correctly connected to the modem. Especially with antenna cables, loose contacts can quickly occur if they are not 100% tightly connected.
When connected to a network socket (LAN):
- Does your end device indicate that no network cable is connected? In this case, there is a problem with a network cable. Please check the network cable for correct connection.
- Always test a different cable. If you do not have a replacement cable at hand, ask a neighbor to provide one for you to test. If it turns out that your cable is defective, please exchange it with your house management or get a new one in a specialist electrical store.
- If you are using a router, please test the Internet connection directly via LAN cable on your end device without the router. Because your router can be the source of failure over which we have no control, so you can exclude it as the cause of the error.
- Please note that if you have more than one socket port in your apartment, not all of them will be connected to the Internet. If you are unable to establish an Internet connection, please first try another port at the LAN socket.
If the problem cannot be solved by the steps described above, please contact our support and tell them:
- Your address and full room number.
- A callback phone number and/or email address, depending on whether you contact our support by email or phone.
- The HFC MAC ID or CM MAC of the modem, if you have one of us.
- If you are using your own router, the manufacturer and model number.
- In detail what steps you have already taken
- Which device with which operating system the problem affects.
Also, please take photos of stickers on the modem/router, the back with the cables, the socket with cables and a short video on which we can see which LEDs are on or blinking. So we can check if everything is connected correctly and where the problem is.
Only with a detailed error description is our support able to help you quickly.
Last updated on 05. Apr 2023
Only one device at a time can be activated on your Internet connection. The MAC address of the activated device is stored in our system for this purpose. To be able to use several devices at the same time, you need a router. If you have trouble using multiple devices at the same time, this can have several causes:
- The LAN cable from the cable modem/network connection is not connected to the WAN port of your router. Please check the correct connection according to the router's operating manual.
- You are not using a router, but a WiFi repeater, access point or switch.
Please check the model number on the manufacturer's website to see if it really is a router.
Unlike other devices, a router manages multiple devices and hides them from the external network. Repeaters, access points and switches, on the other hand, directly discharge all connected devices. Since only one device can be activated at your Internet connection at the same time, the devices deactivate each other. - You have selected the wrong WiFi mode
There are routers that can be configured for an operating mode. Usually: Router, access point and repeater. In order to be able to operate the router on our network, please always configure the device to "router mode". - The router is configured false (MAC cloning)
Some manufacturers offer the possibility to clone the MAC-address of connected devices. This leads to address conflicts and must be disabled. - NAT setting is missing
Please always configure your router to NAT mode. Other settings (e.g. bridging mode) can lead to errors. - You are using a Fritz!box that is not configured correctly. Please have a look at the FAQ article "How can I use a Fritz!box at my connection?" an.
Unfortunately, we cannot provide you with any further support for setting up your router, as we have no documentation of the many routers available on the market. For further help, please contact the manufacturer's support directly and point out that you want to operate the router on a network (LAN) or broadband cable connection.
Last updated on 08. Apr 2020
To check the speed of your Internet connection, you must connect your computer directly to your network socket or cable modem using a cable. If you are using a WiFi router, it must be removed before measurement. Please also close all programs that could possibly use the Internet connection.
We need a total of three speed tests for the analysis, at intervals of at least three hours.
Please send the Test-IDs to us by email with your name, address, complete room number and contact details.
Last updated on 05. Apr 2023
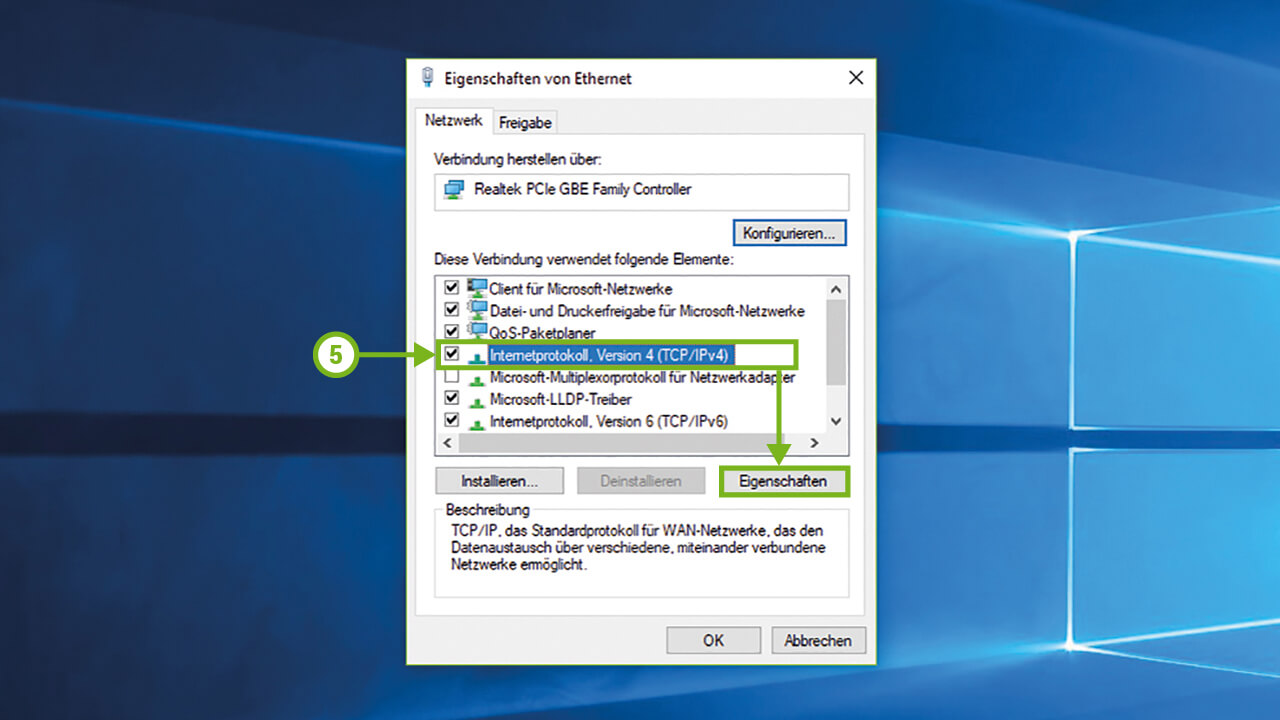
For a trouble-free use of our Internet connection, it is necessary to configure your network adapter to obtain the IP address and DNS server address automatically.
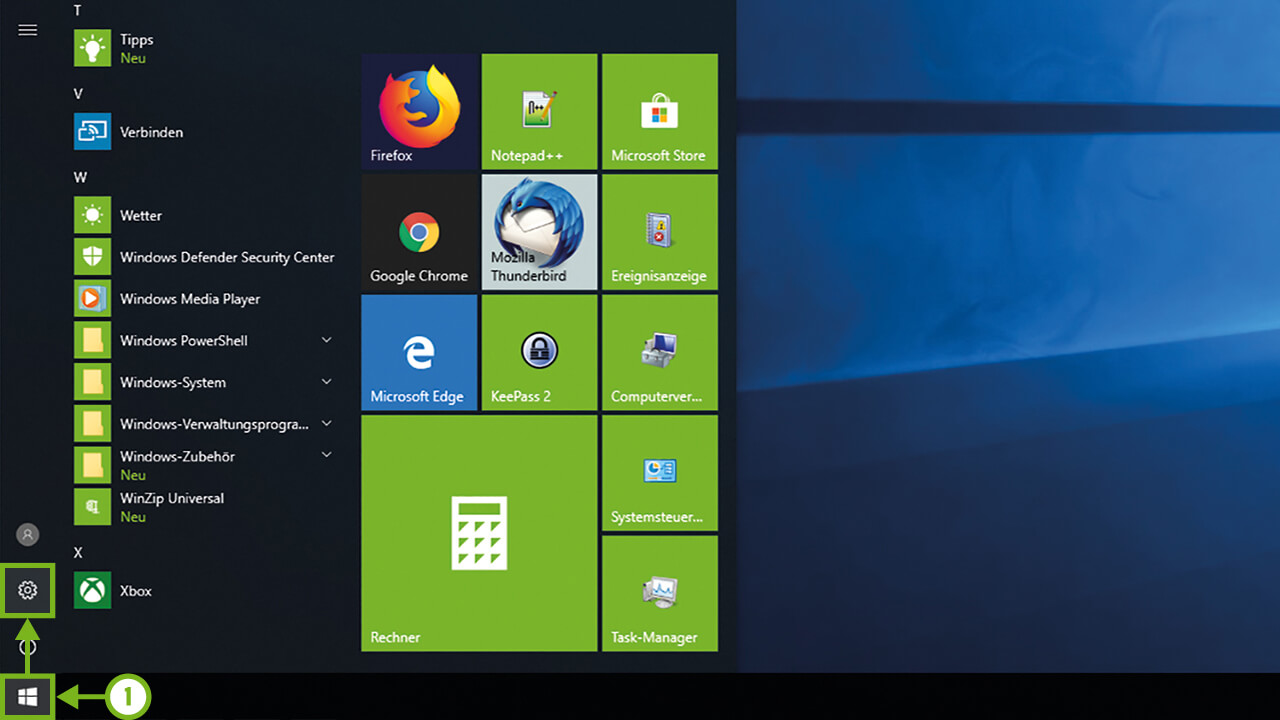
1) To do this, open the settings via the start menu..
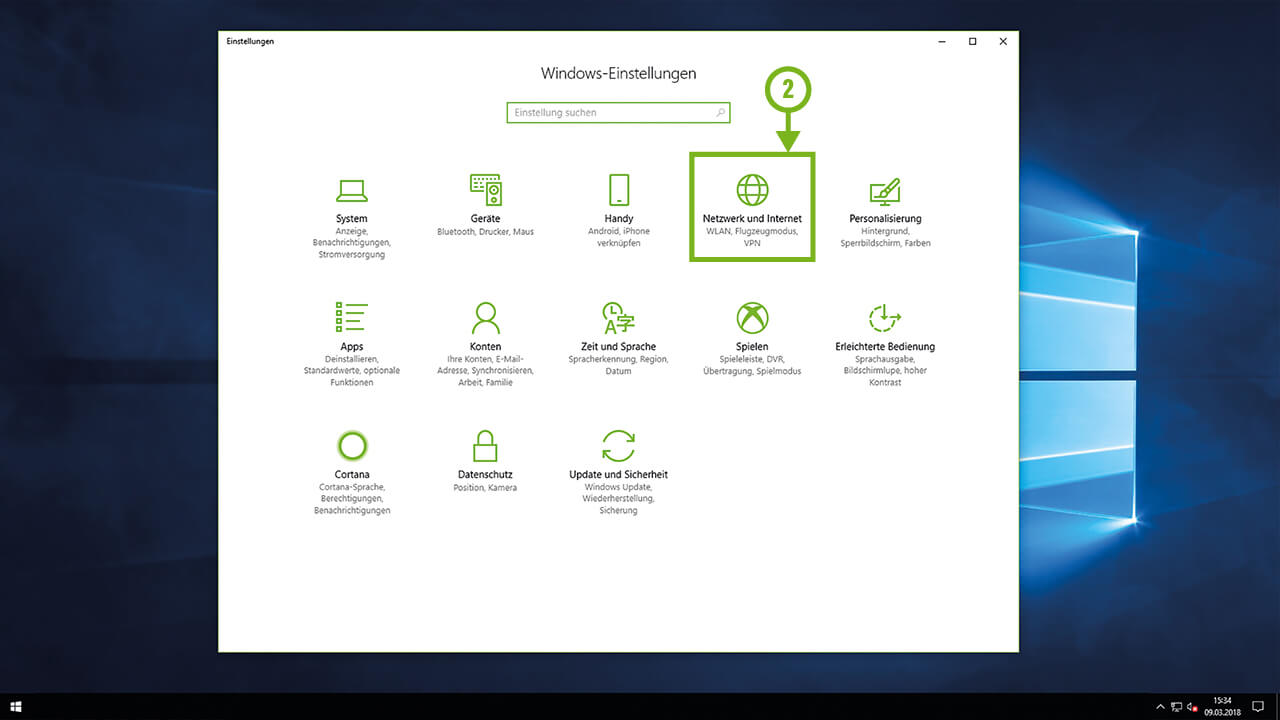
2) Select the "Network & Internet" settings.
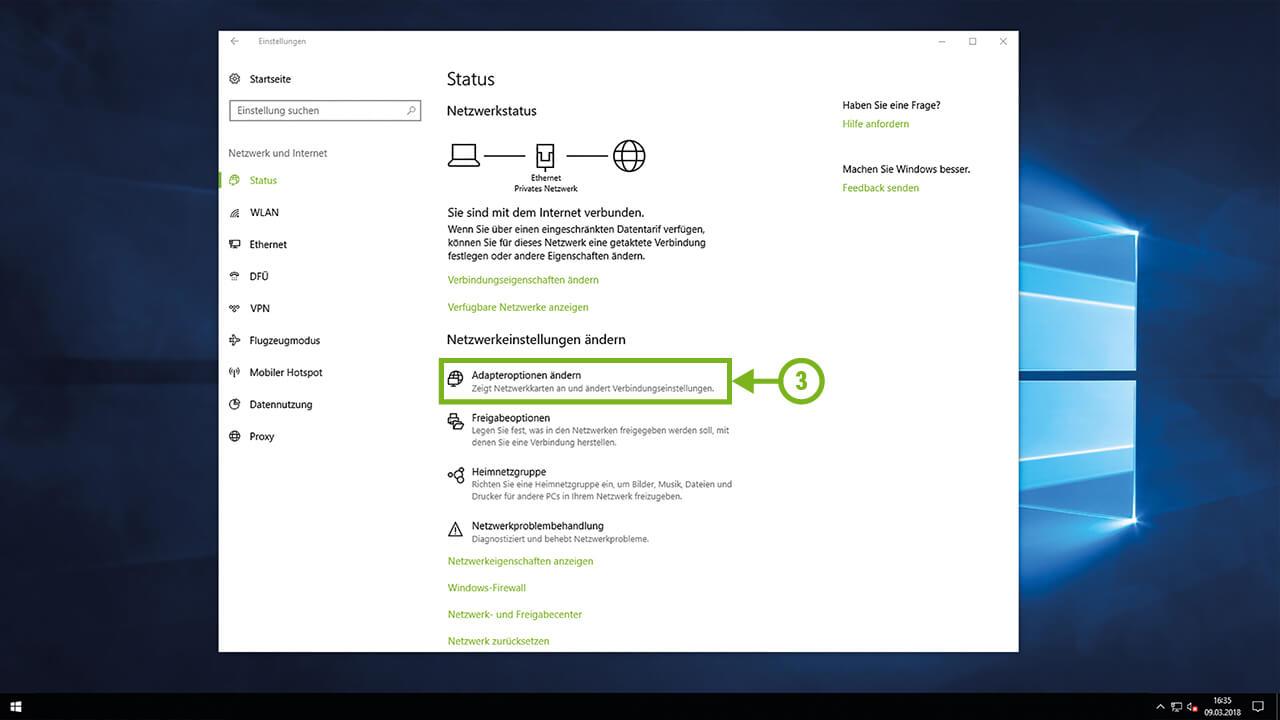
3) Select the "Change Adapter Options" settings.
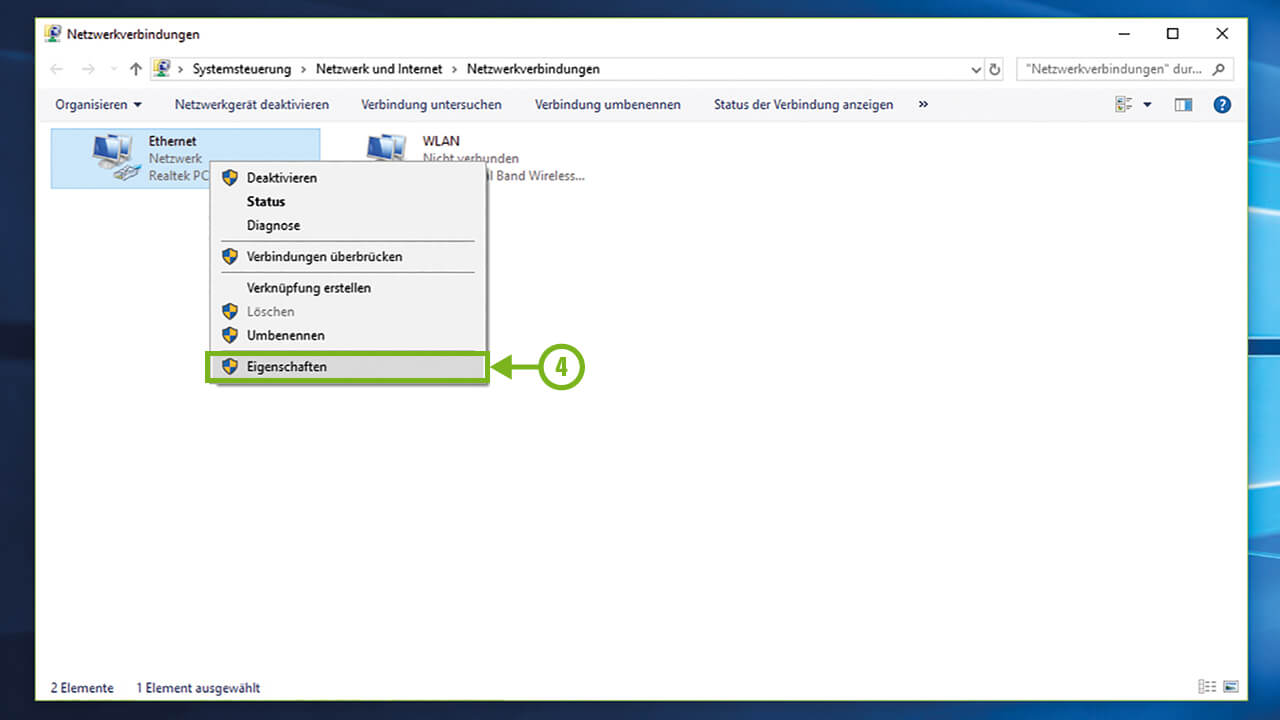
4) Now right-click on your Ethernet adapter (LAN port) and select the "Properties" option. Repeat the steps from here for the WiFi adapter (WiFi connection).
5) Click with the left mouse button once on the text "Internet Protocol, Version 4 (TCP/IPv4)" to select it and then on "Properties".
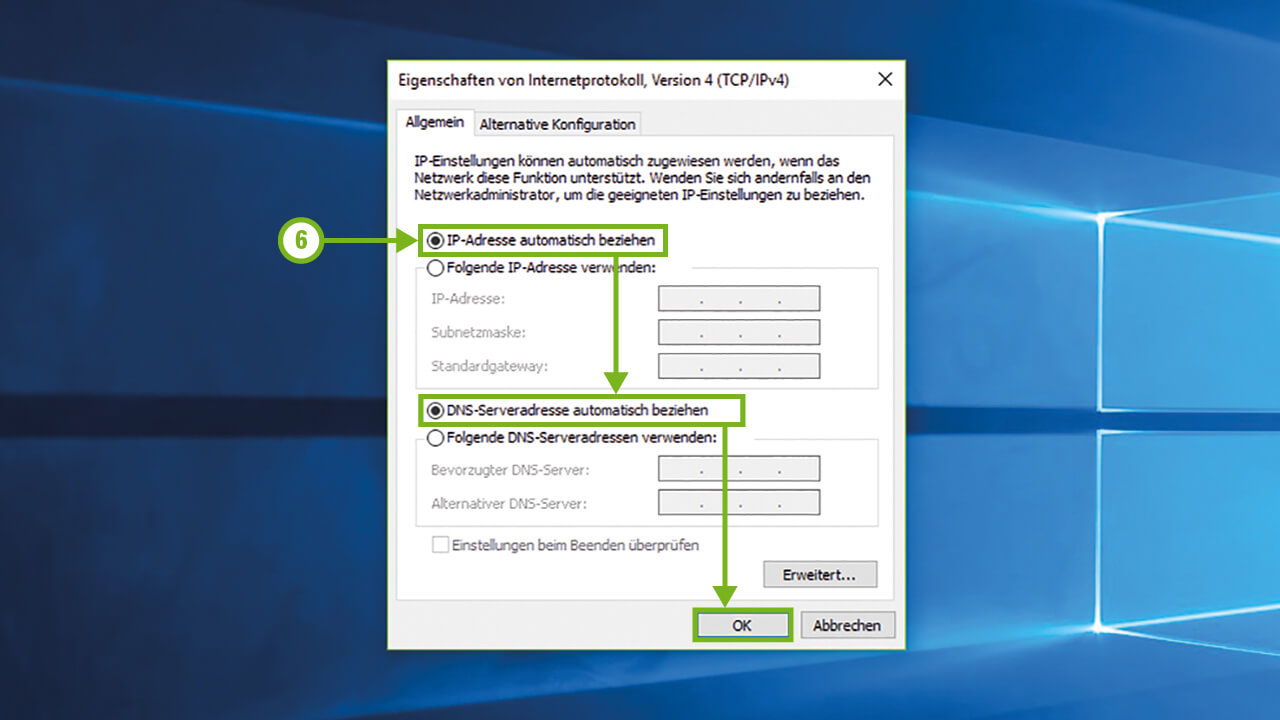
6) Set the options to "Obtain IP address automatically" and "Obtain DNS server address automatically". Confirm this with "OK".
7) Confirm the changes with "OK".
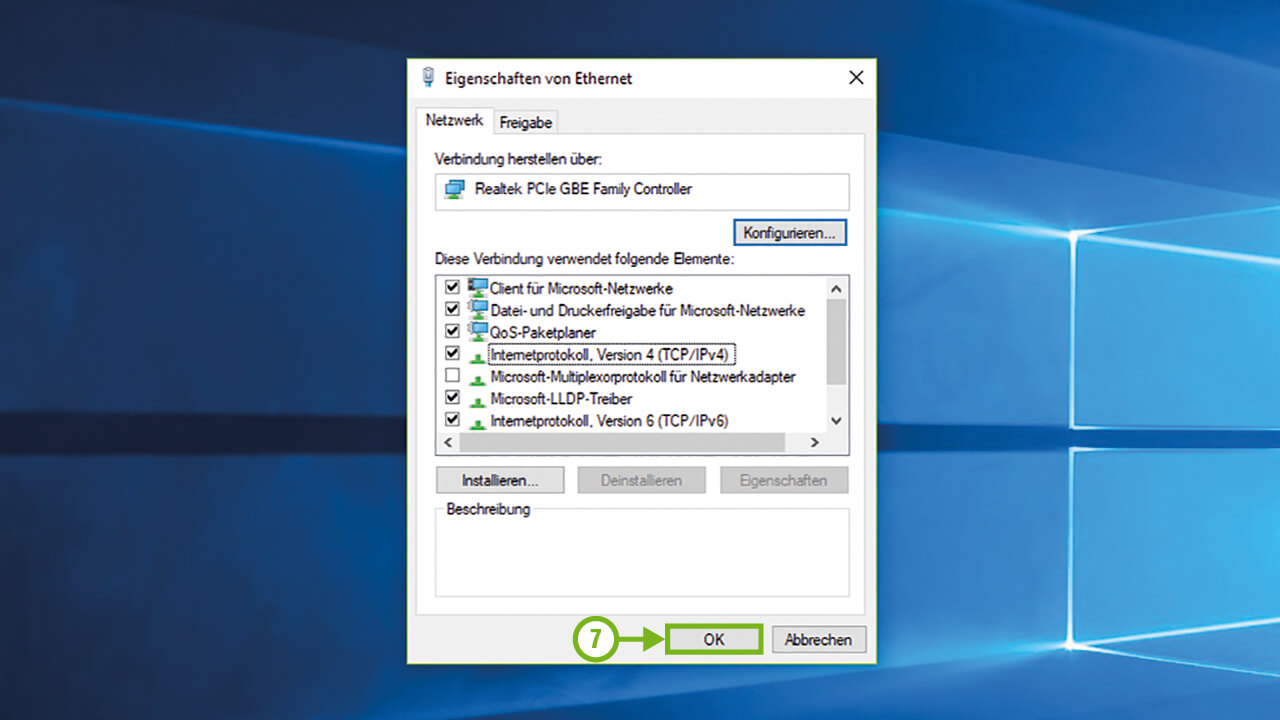
Your LAN adapter is now configured to use the Internet connection. If you want to access our hotspots via a WiFi, please repeat the steps from point 4 for your WiFi adapter.
Note: Be careful not to uncheck the text in the properties window, as this would cause problems with your Internet connection.
Last updated on 08. Apr 2020
For a trouble-free use of our Internet connection, it is necessary to configure your network adapter to obtain the IP address and DNS server address automatically.
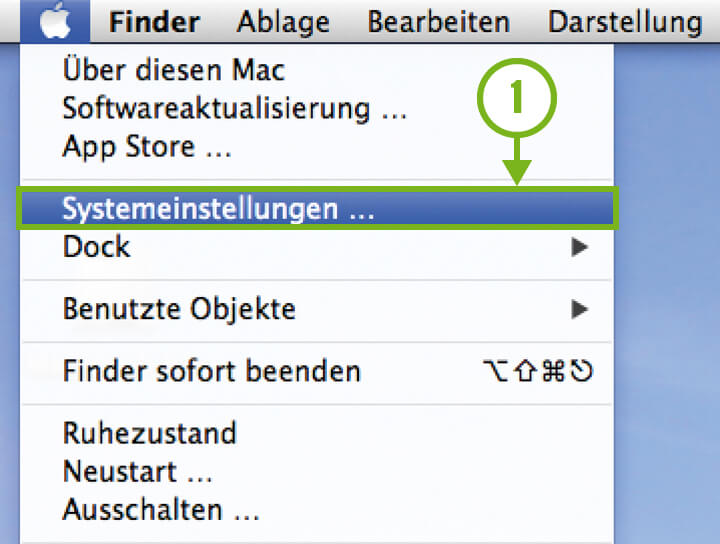
1) To do this, open System Preferences, which you can find via the Apple menu on your computer.
2) Select the "Network" settings.
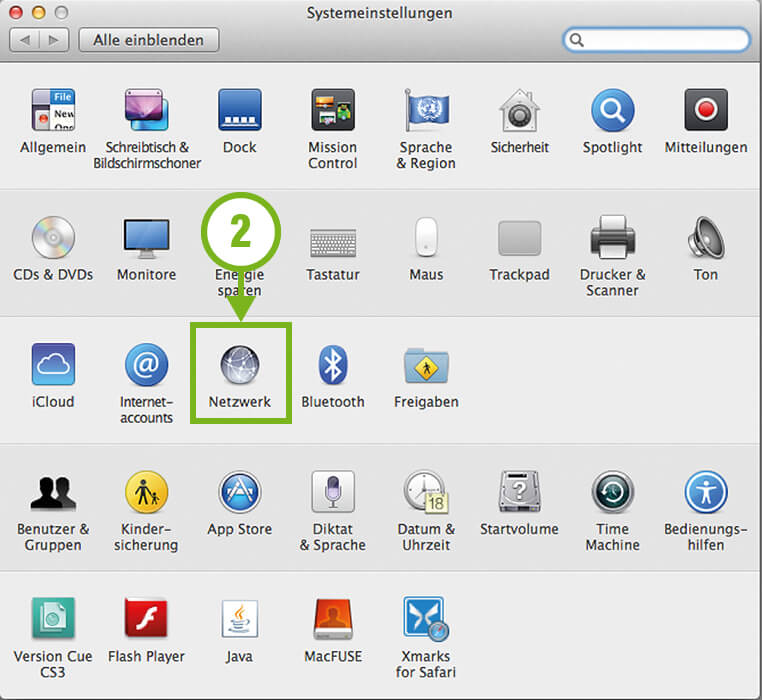
3) Select the Ethernet adapter (LAN port) and click "Advanced". Repeat the steps from here for the WiFi adapter (WiFi connection) later.
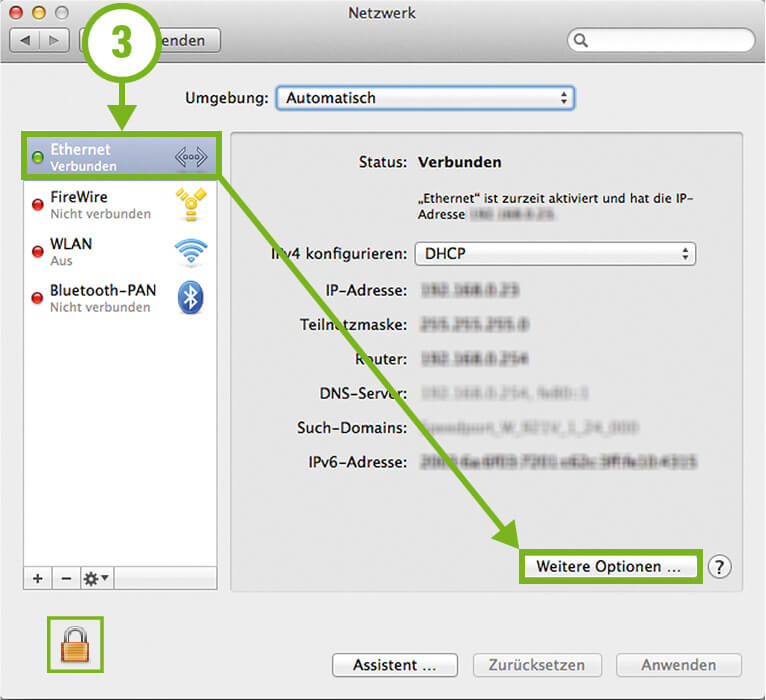
Note to the lock icon: This should only be observed for Mac OS versions prior to Mavericks OS X.
If a lock icon is displayed, it is necessary that it is open, otherwise no settings are possible. To open the lock, please click on the lock and enter the login data of your main user account.
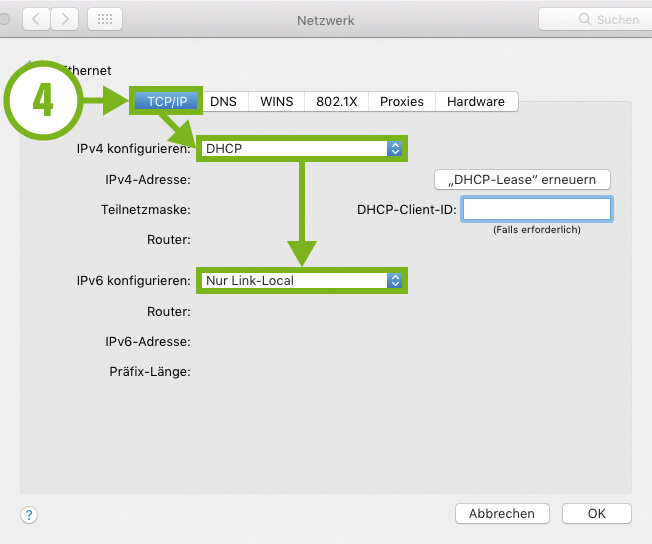
4) Click on the „TCP/IP“ tab. Then select „DHCP“ for „Configure IPv4“ and „Link-local only“ for „Configure IPv6“.
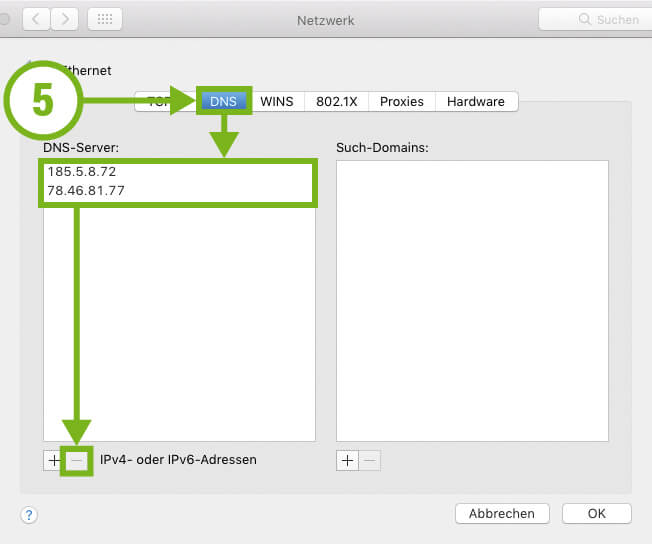
5) Click on the „DNS“ tab. If you find an entry here that you can select and delete with the minus button, please do so. If the entries are not selectable, they were automatically obtained.
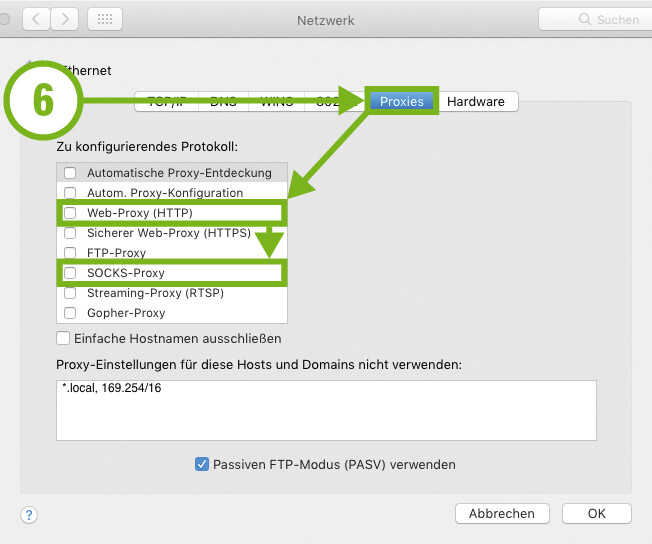
6) Click on the „Proxies“ tab. Here it is important that the check marks for „Web-Proxy (HTTP)“ and „SOCKS-Proxy“ are removed. At best, all proxy settings are disabled.
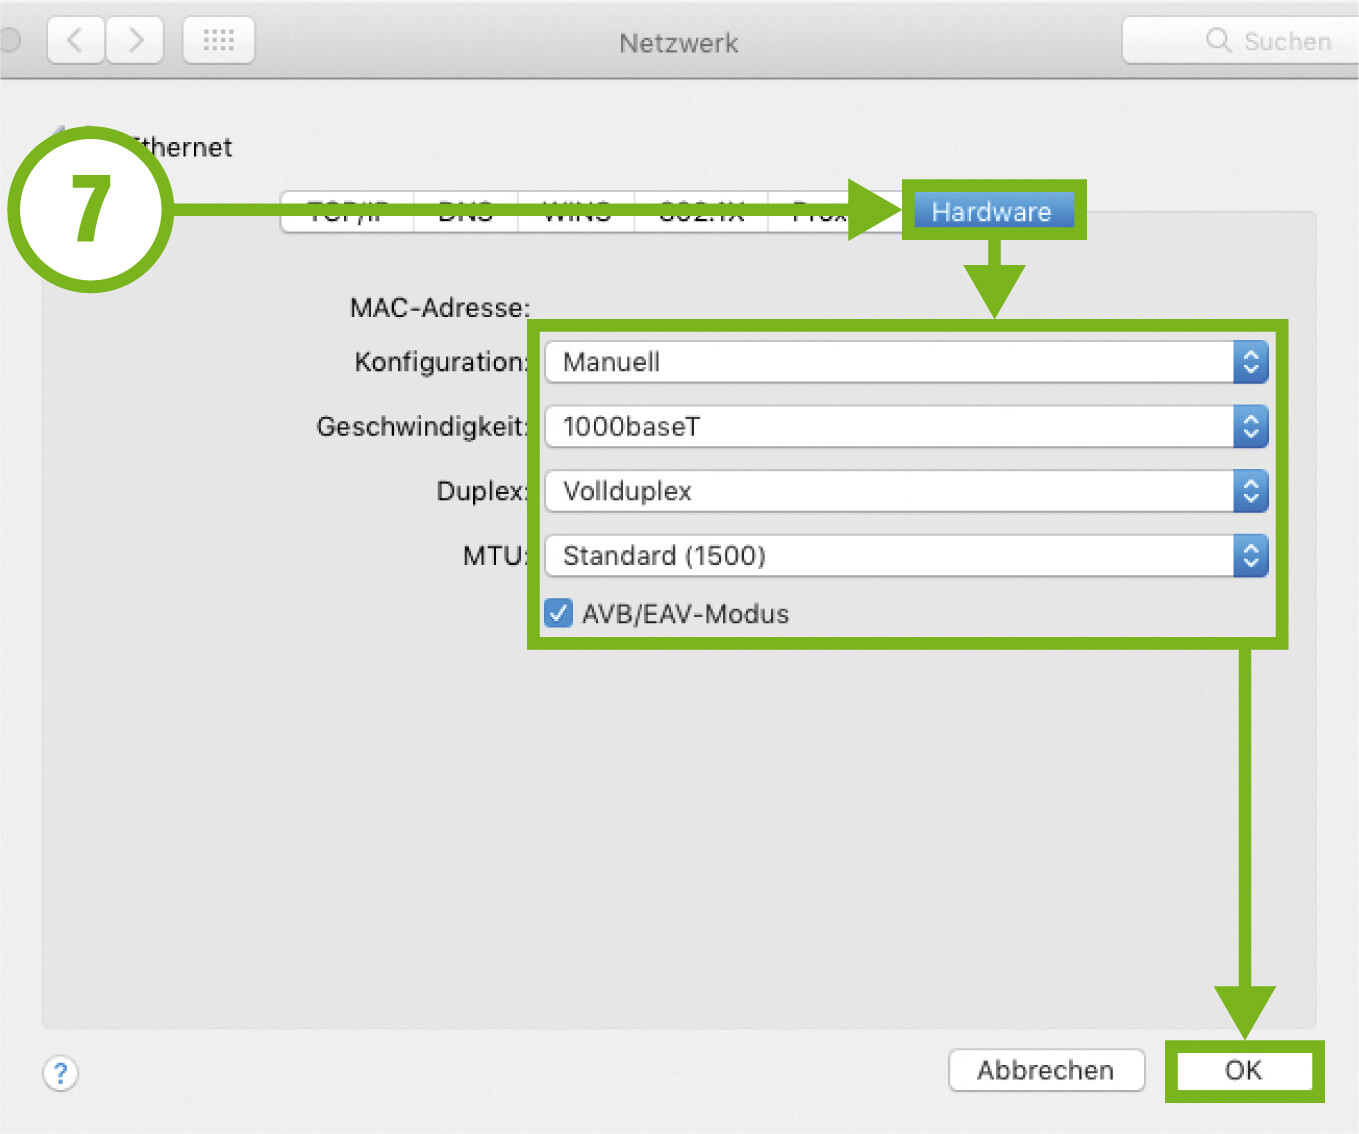
7) Click on the „Hardware“ tab. If you are using a USB LAN adapter, please set the following settings: Configuration „Manual“; Speed „1000baseT“; Duplex „Full duplex“ MTU „Standard (1500)“; ABV/EAV mode „activated“. Confirm all changes with „OK“.
Your LAN adapter is now ready to use the Internet connection. If you want to access our hotspots via a WiFi, please repeat the steps from point „4“ for your WiFi adapter.
Last updated on 08. Apr 2020
For a trouble-free use of our Internet connection, it is necessary to disable the proxy settings on your device. To do this, follow these steps:
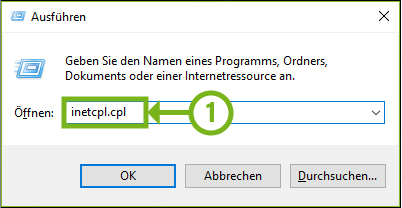
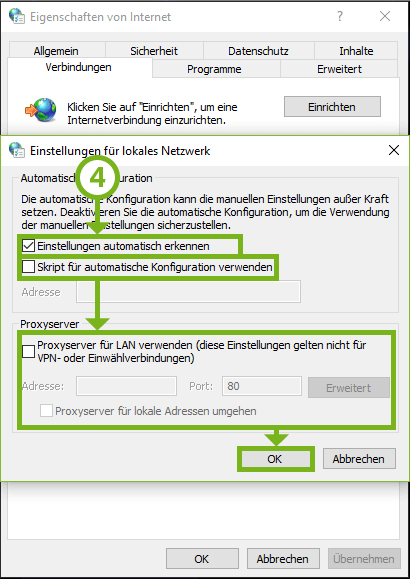
1) To do this, press the "Win+R" keys on your keyboard to open the "Run" window. Enter "inetcpl.cpl" and confirm with "OK".
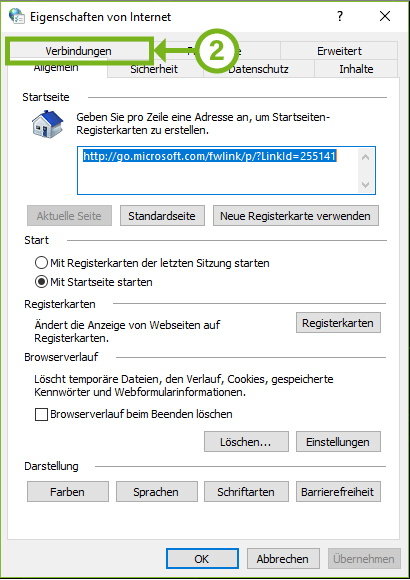
2) In the "Internet Properties" window that opens, select the "Connections" tab.
3) In the tab „Connections“, „Dial-up and Virtual Private Network settings“ should be empty. Delete entries if necessary and then click on „LAN settings“.
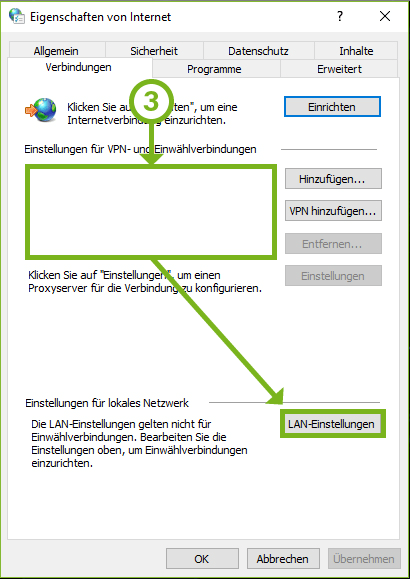
4) The option „Automatically detect settings“ must be checked and all other options must be unchecked and their entries removed. Then confirm the changes with „OK“. The proxy settings are then disabled.
Last updated on 08. Apr 2020
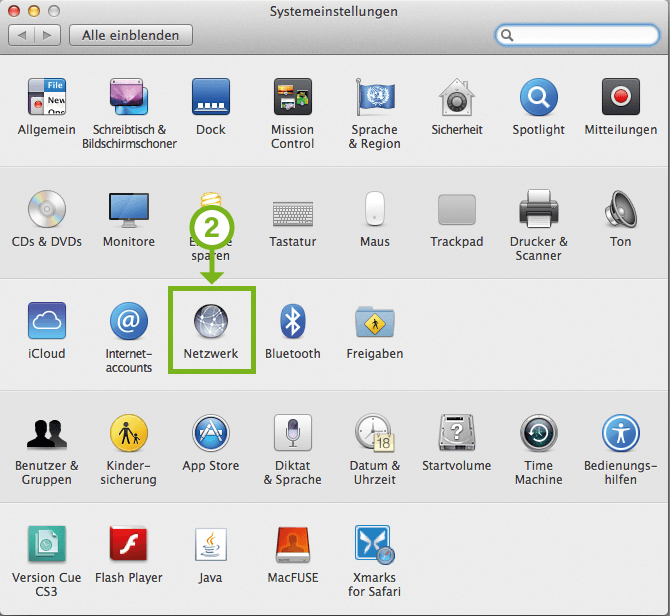
For a trouble-free use of our Internet connection, it is necessary to disable the proxy settings on your device. To do this, follow these steps:
1) To do this, open System Preferences, which you can find via the Apple menu on your computer.
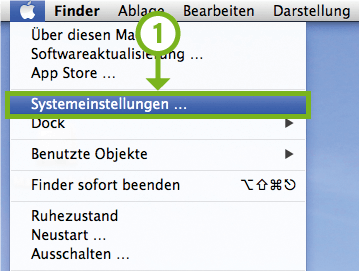
2) Select the „Network“ settings.
3) Select the Ethernet adapter (LAN port) and click on „Advanced“. Repeat the steps from here for the WiFi adapter (WiFi connection) later.
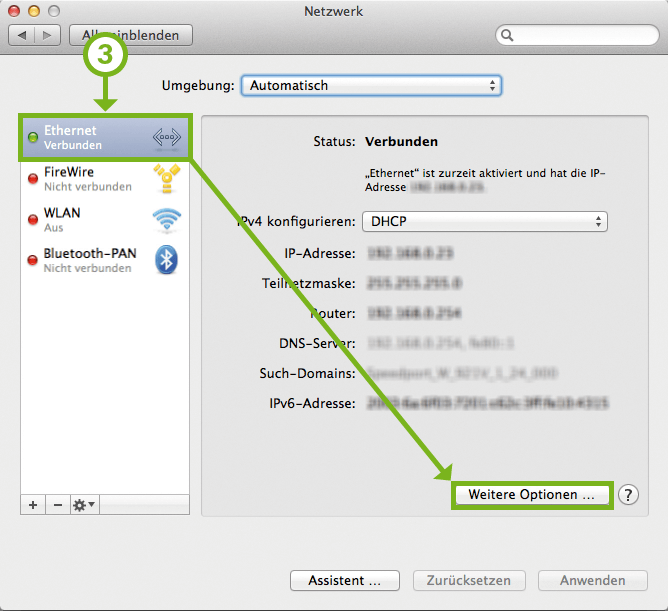
Note to the lock icon: This should only be observed for Mac OS versions prior to Mavericks OS X.
If a lock icon is displayed, it is necessary that it is open, otherwise no settings are possible. To open the lock, please click on the lock and enter the login data of your main user account.
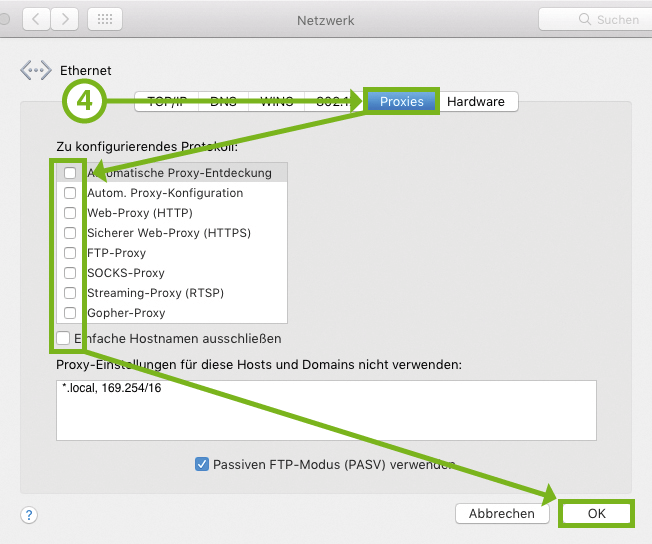
4) Click on the „Proxies“ tab. Remove all check marks here and confirm the settings with „OK“. Now all proxy settings are deactivated.
Last updated on 08. Apr 2020
If you want to use an AVM Fritz!box at our connection, certain settings have to be set at your Fritz!box. In the following video, the settings to be set are explained and introduced: https://youtu.be/VKS0bGh0Iiw
You can then activate your connection at https://activation.my-wire.de. This website must be opened via the Fritzbox!
Last updated on 23. Dec 2023
Unfortunately, we do not offer separate bandwidth upgrades. The internet connection in your apartment is based on a supply contract between your landlord and us. The Internet connection is regularly paid with a part of the ancillary rental costs.
In individual cases, however, the bandwidth of a single customer connection may be very low because there may be technical problems with your connection. In such cases, our support team will be pleased to help you.
Last updated on 08. Apr 2020
If you activate your connection via your room number or log into our WiFi system with your hotspot login data, you do not need to take any further steps. You do not have to cancel or terminate the connection.
If you have rented an IPTV box from us, please note the cancellation period of 3 months. At the end of the rental period, simply return the IPTV box to us. Upon receipt we will refund the deposit.
Last updated on 08. Apr 2020
WiFi
Usually our WiFi routers send a public unencrypted hotspot network with the SSID "MYWIRE", as well as encrypted networks with the SSIDs "MYWIRE-PEAP" or "MYWIRE-SECURE". You will also find many other networks with corresponding serial numbers, such as MYWIRE-PEAP-XXX or MYWIRE-SECURE-XXX.
We recommend that you only use our encrypted networks, if possible. Our encrypted networks use WPA2-Enterprise (PEAP) as encryption technology. WPA2-Enterprise complies with the recommendations of the German Federal Office for Information Security (BSI) and guarantees a high level of security insofar as the following recommendations are implemented and activated:
When setting up the WiFi, please be sure to enter our server "radius.my-wire.de" (domain) and install the corresponding CA certificate, which you can download and install here:
CA certificate for radius.my-wire.de in PEM format
Please select only the installed CA certificate during WiFi setup. WiFi can also be used without a certificate check, but this not only risks losing the WiFi password, but also simplifies a man-in-the-middle attack in which the attacker can take full control of the victim's Internet access and redirect him to compromised sites. It is therefore advisable to install the certificate and store our server in the WiFi settings.
Last updated on 07. Sep 2023
If you need WiFi in your room and want to use several devices at the same time without reactivating them, you will need a router which you can buy at a computer shop. Please make sure that the router is usable with a cable modem or network connection, as some routers only work with a DSL connection and therefore cannot be operated with our connection. For the use at our connection we can recommend the TP-Link Archer C80 WiFi router, which you can order here:
https://amzn.to/3STTDx8 (Payed Link*)
Connect the router with the WAN or INTERNET port to your cable modem or network connection in your room. The WAN/INTERNET port must be set so that it obtains its IP address automatically (DHCP or dynamic IP).
If you have received a cable modem from us, please disconnect the cable modem from the power supply briefly after you have connected the router to the cable modem. You must then activate the connection once using a computer connected to the router. To do this, start a web browser and open any website. You will be automatically redirected to our activation portal, where you will need to enter your connection details once. After successful activation, your router will be activated and the connection can be used. If the activation page does not open automatically, you can access it here: https://activation.my-wire.de.
Note:
If you need to connect your router to a cable modem, please restart the cable modem when changing the device. This will clear the filter with the last activated device.
Unfortunately, we cannot provide you with any further support for setting up your router, as we have no documentation of the many routers available on the market. For further help, please contact the manufacturer's support directly and point out that you want to operate the router at a network (LAN) or broadband cable connection.
*) As an Amazon partner, we earn money from qualified sales.
Last updated on 31. Jan 2024
Note: Please never share your login data with third parties and use the password only for WiFi access in your dormitory.
If "MYWIRE" WiFi is available in your apartment complex, you will need personal login data to connect to the "MYWIRE" networks. You can obtain these as follows:
- In the customer portal: Connect to the free "MYWIRE" WiFi network. A hotspot web page https://hotspot.my-wire.de will open in your browser. Either follow the link on the hotspot web page or open the URL manually: https://portal.my-wire.de (The URL only works within the dormitory network!). If you receive a message on our customer portal that access has been denied, you may not have connected to the Internet via the residential complex's mywire network or your residential complex has not yet been migrated to the portal.
- Via landlord: You will receive the necessary data from the reception desk or from your house manager when you move in.
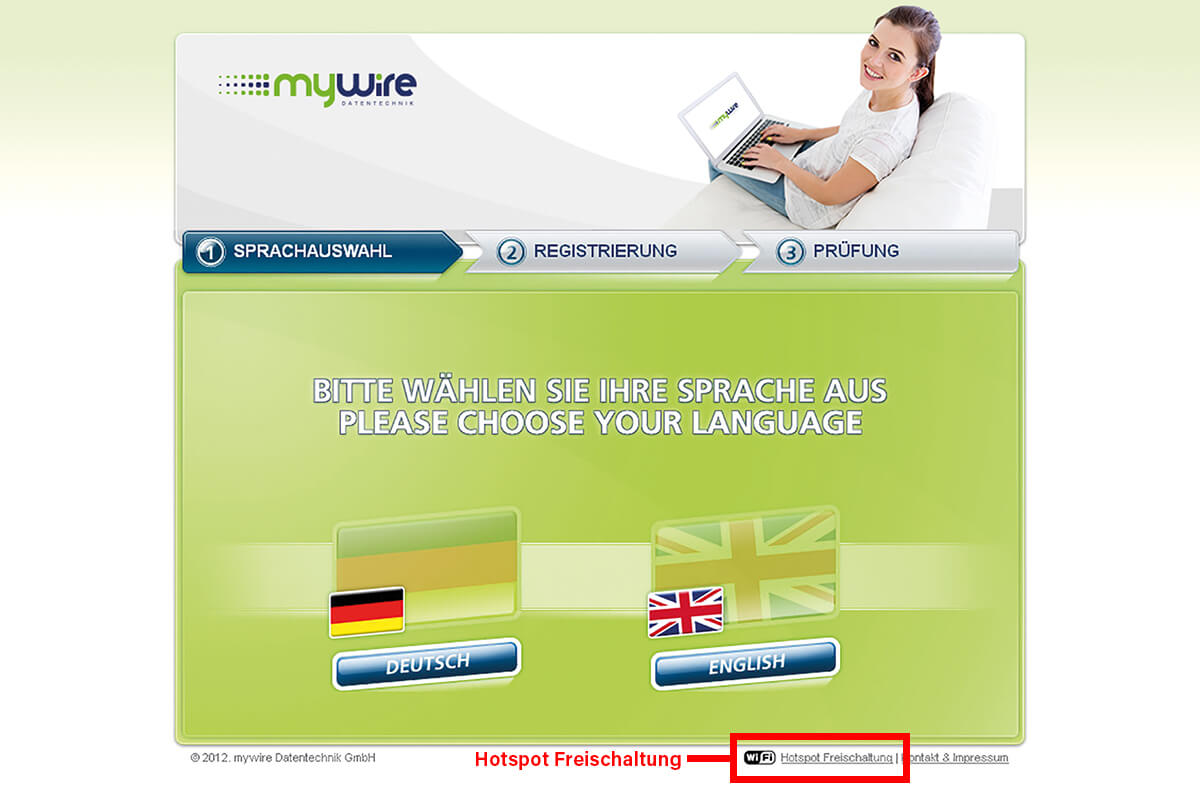
- Via activation page: In residential complexes without mywire routers, but with public mywire hotspots, WiFi login data can be requested via the activation page. To do so, please open our activation page in your room directly at your network or cable modem connection: https://activation.my-wire.de (The URL only works within the dormitory network!) On the activation page please click on the link "Hotspot Freischaltung" in the footer of the portal (see picture). If you do not see a link at this point, the login data will be distributed exclusively by your reception or house management.
Please let us know your German mobile phone number to which we should send your login data by SMS. Unfortunately, we cannot accept foreign mobile numbers as we cannot verify them.
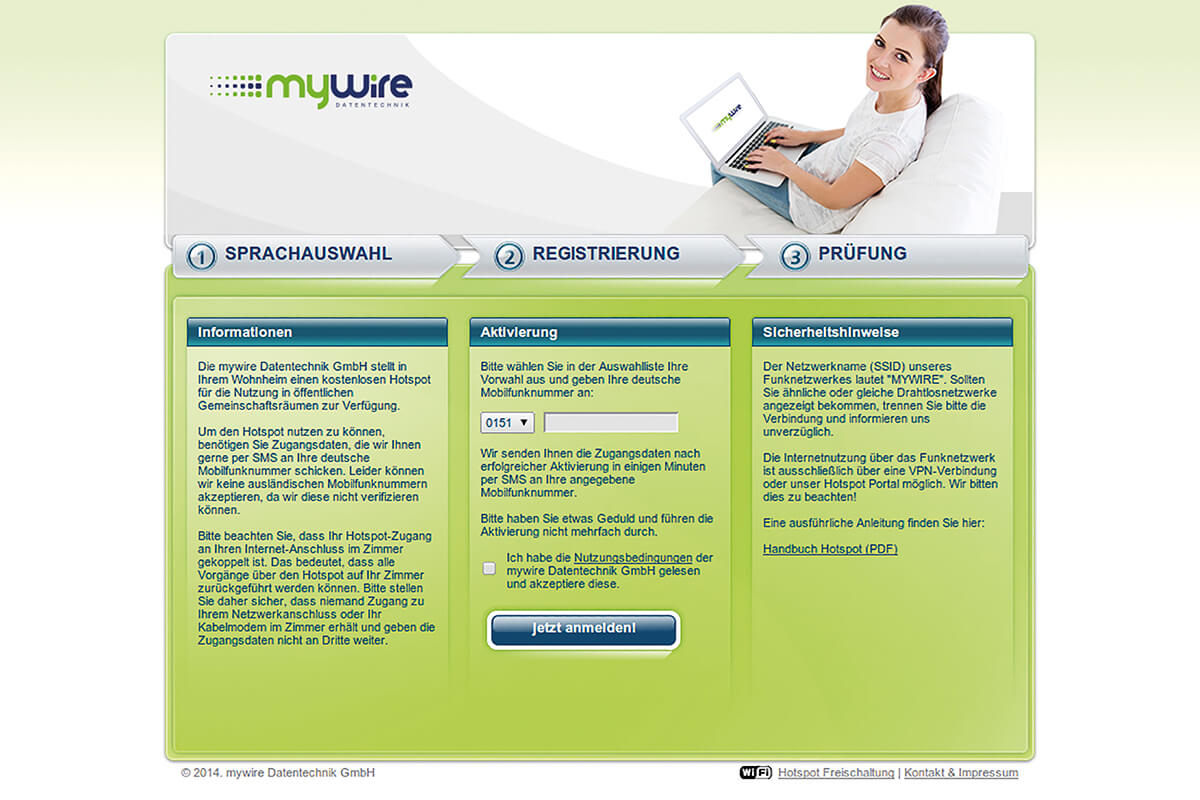
Now you will receive a registration confirmation:
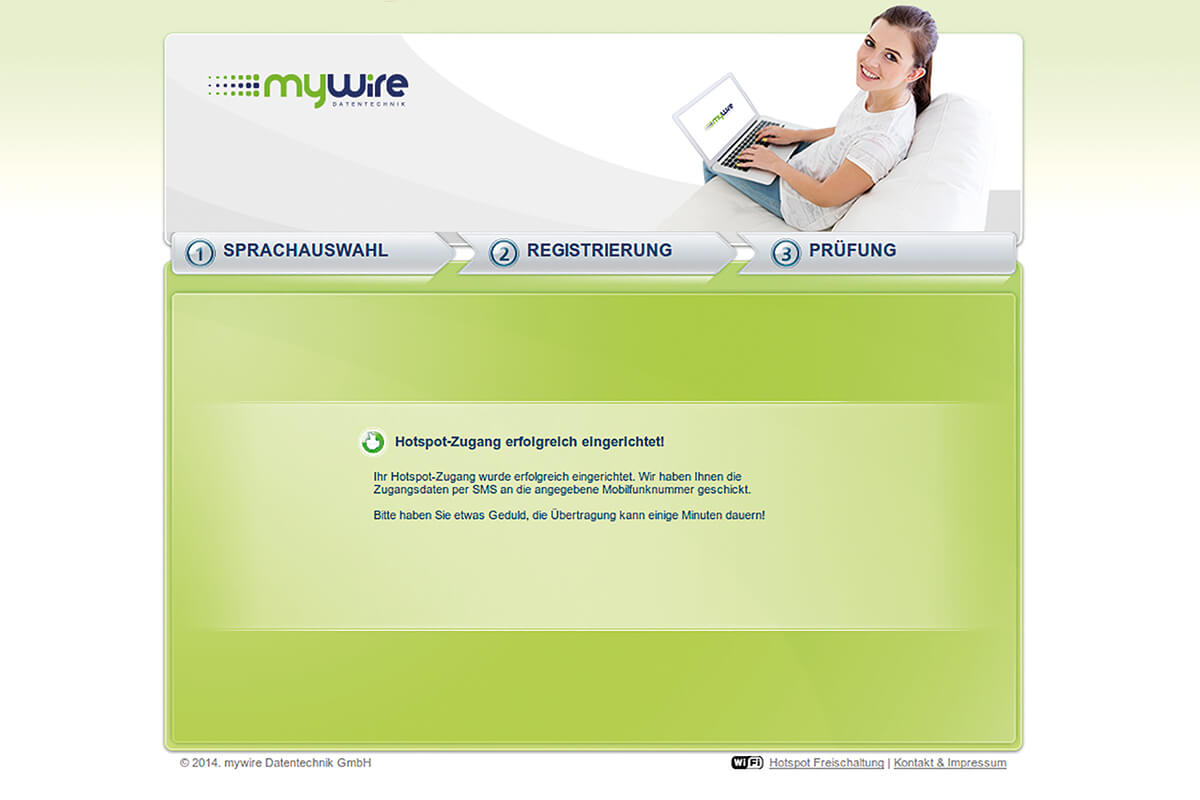
You will receive your login data as soon as possible by SMS to your specified mobile phone number. Please be patient. The transmission may take a few minutes.
Last updated on 13. May 2022
Since the personal login data for the "MYWIRE" WiFi networks is usually distributed via the reception or house management, we cannot verify whether you are authorized to receive a specific password. Please always contact your house management for the recovery of the access data. They can provide you with information about the login data distributed to you or assign you a new data record.
If you have received your login data via our customer portal via SMS, please request new login data again.
Last updated on 08. Apr 2020
In order to use our "MYWIRE" WiFi networks without problems, it may be necessary to manually set up the WPA2-Enterprise connection, which we would like to explain in this article.
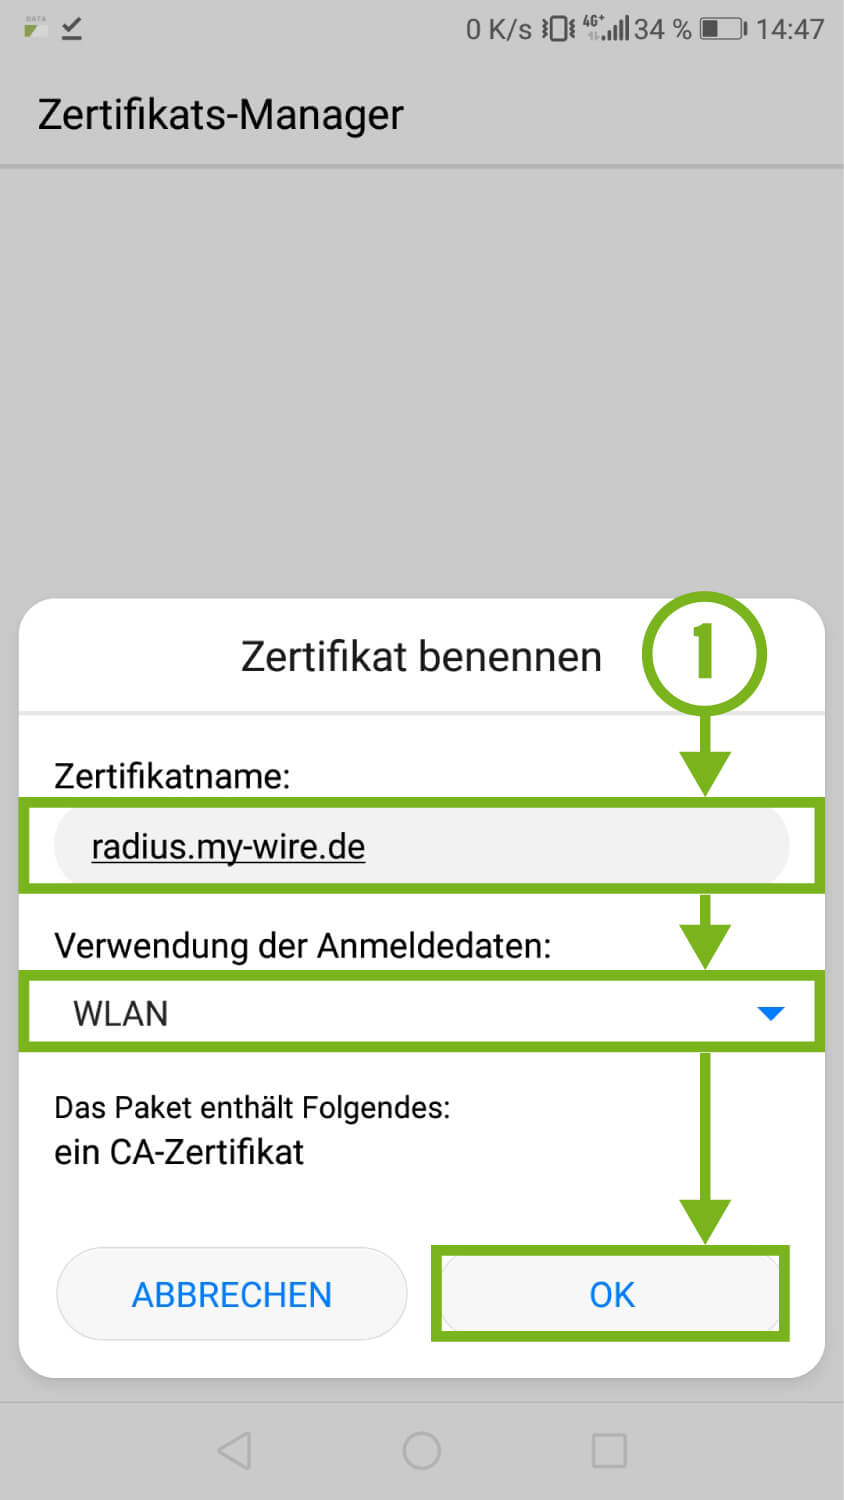
IMPORTANT: You need a security certificate, which you should download first with your device: CA certificate for radius.my-wire.de in PEM format For more information on the CA certificate, please refer to the FAQ article.: Important safety instructions for the use of the WiFi networks provided by us! If you need help with certificate installation or deleting an old certificate, follow this link: https://support.google.com/pixelphone/answer/2844832?hl=en
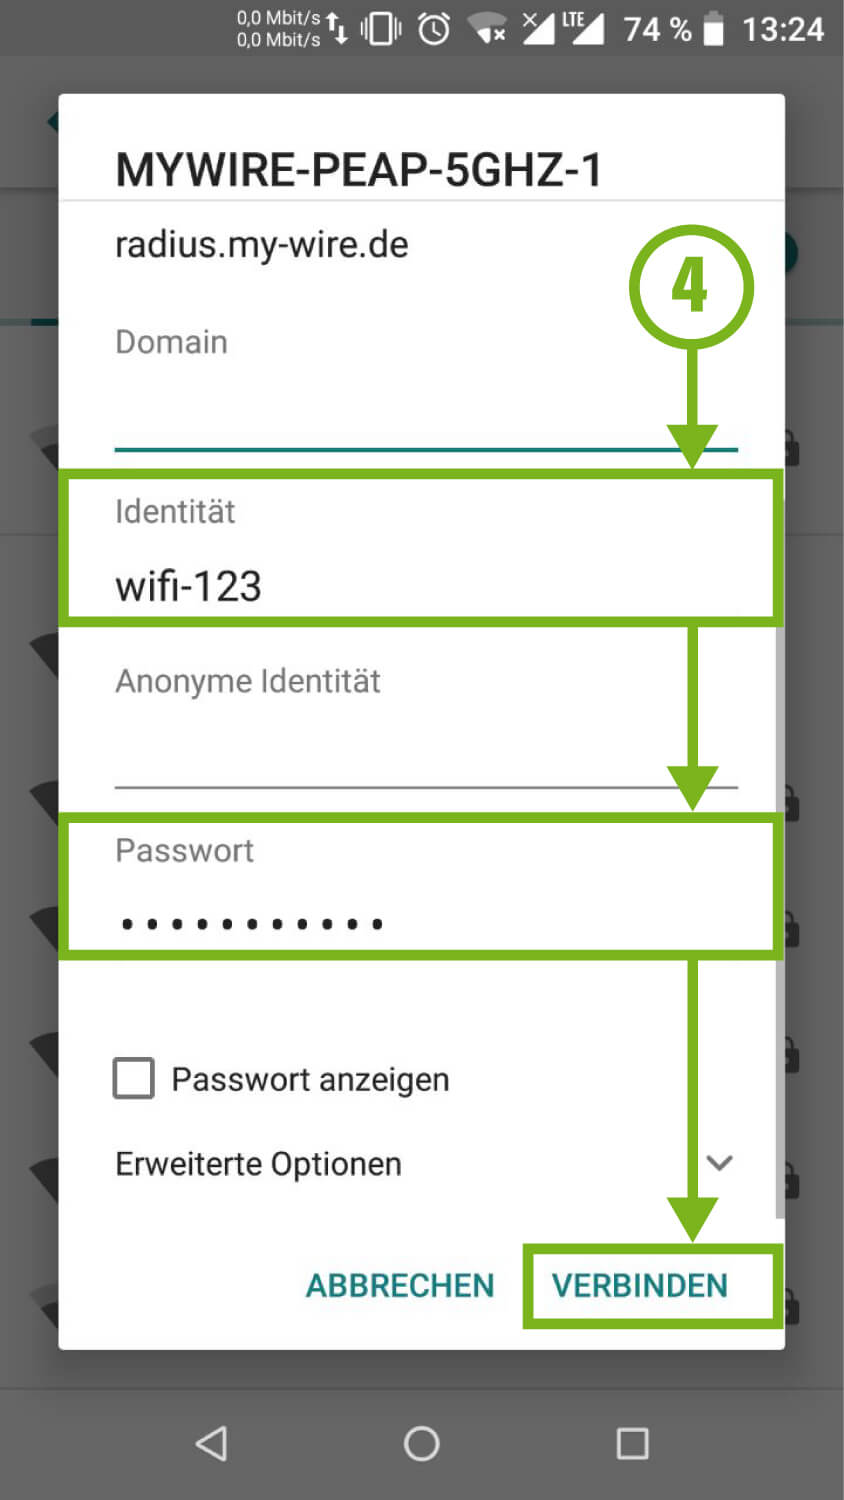
1) After downloading the certificate you have to name the certificate. In our example the name is "radius.my-wire.de". When using the login data, select "WiFi " and confirm the settings with "OK ".
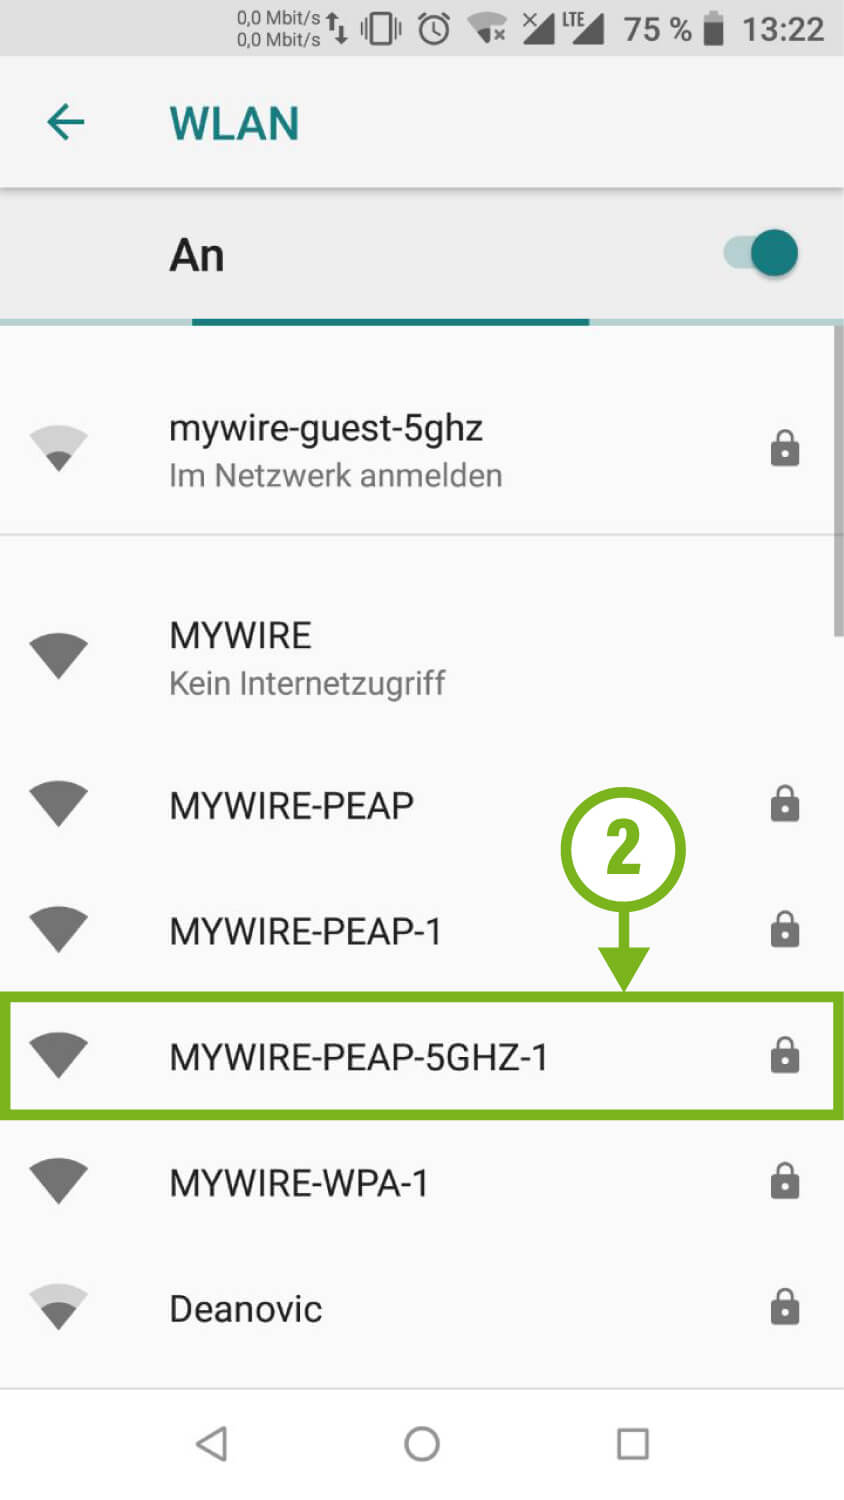
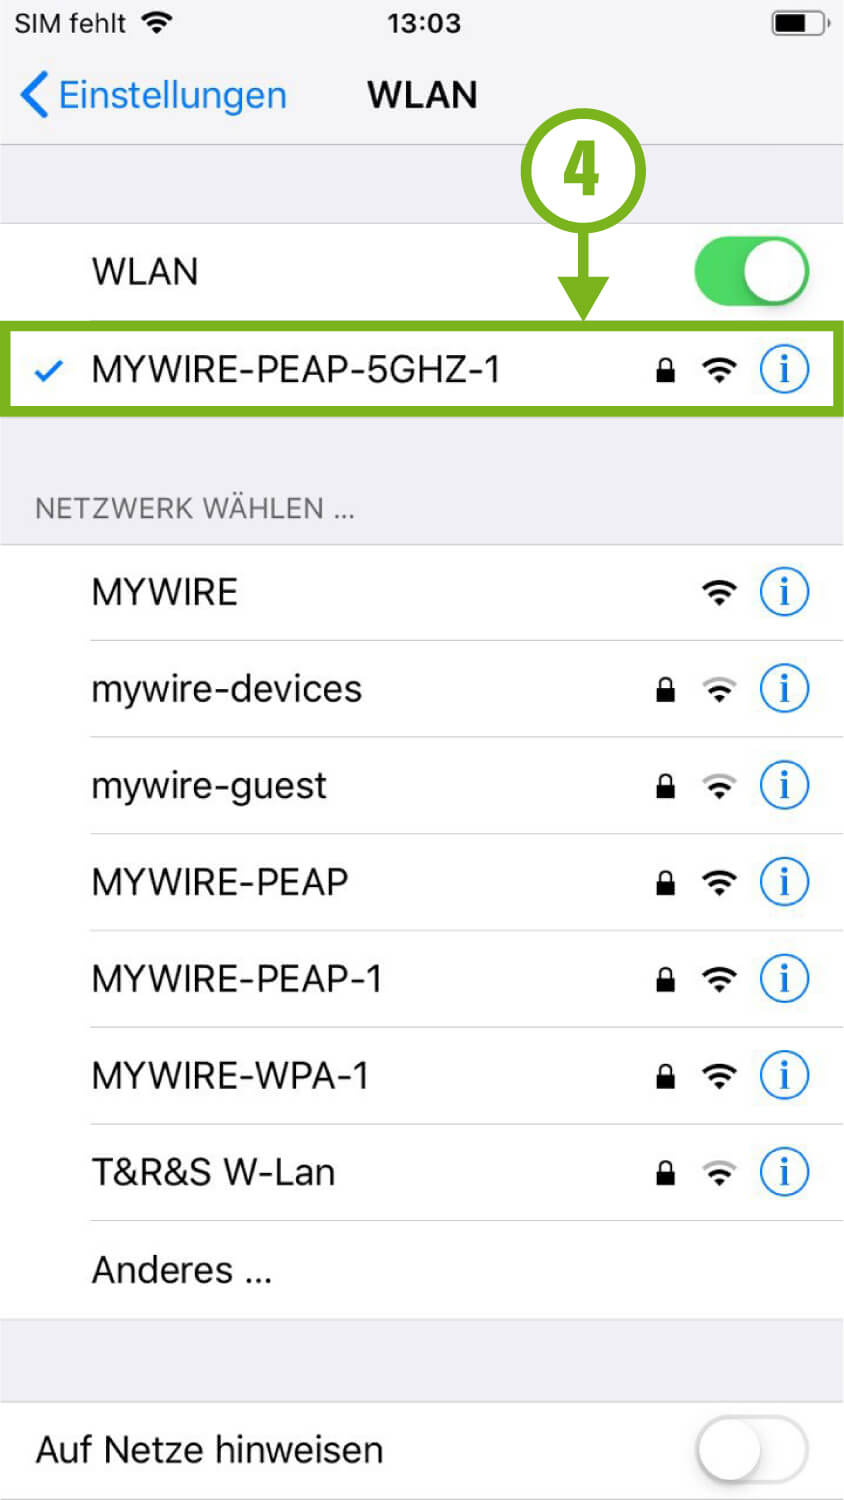
2) Now select your "MYWIRE-PEAP-XXX" or "MYWIRE-SECURE-XXX" network in the WiFi settings. Information about the different "MYWIRE" WiFi networks and 5GHZ WiFi can be found in our FAQs.
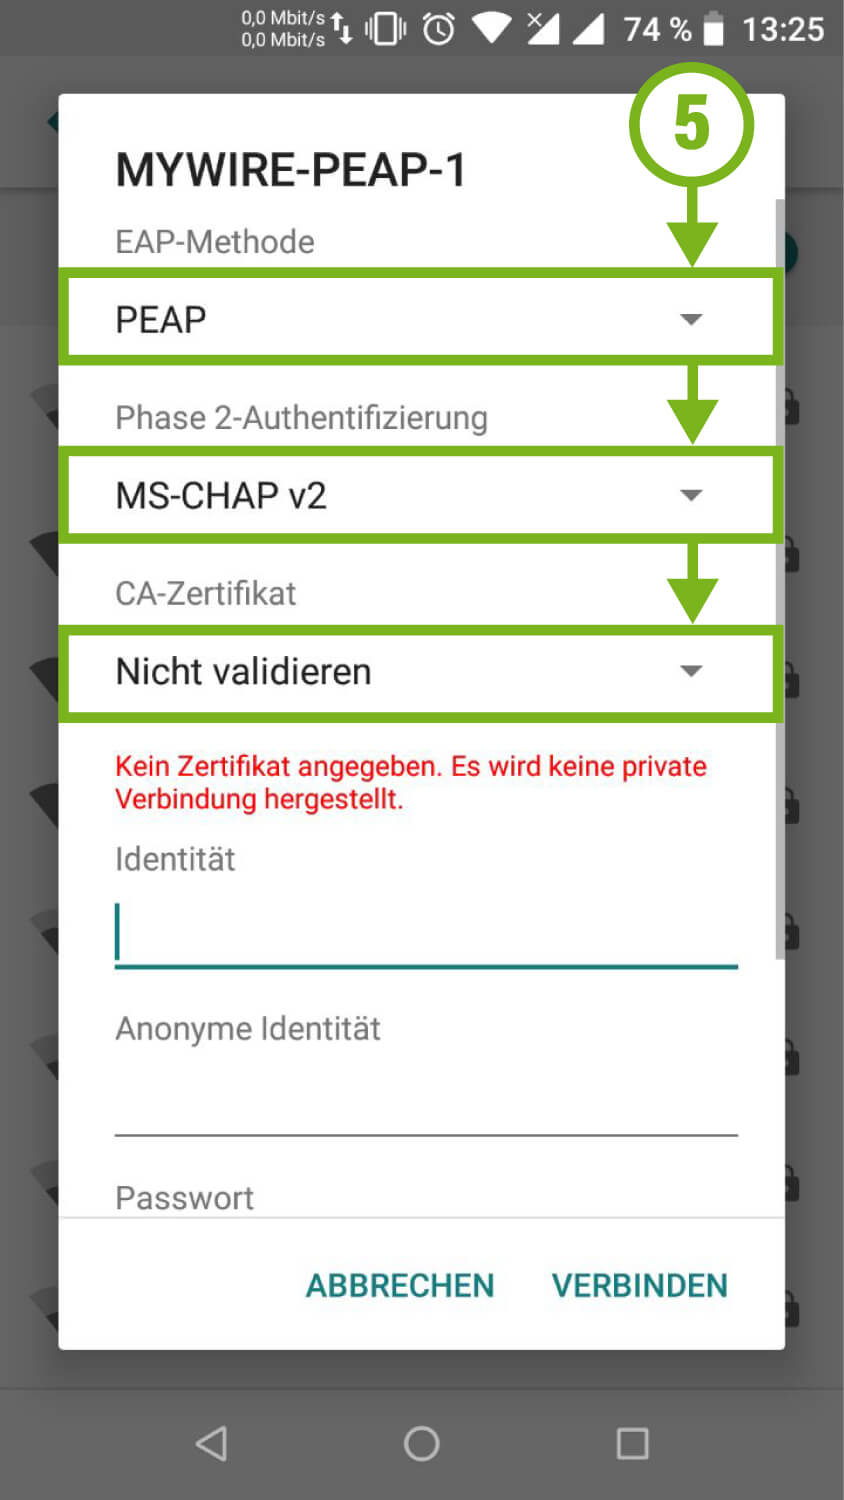
3) After selecting the WiFi network, make sure that "PEAP" is selected for EAP method, "MS-CHAP v2" for Phase 2 authentication and "radius.my-wire.de" (name you entered in step 1) for CA certificate. Some devices expect you to enter a domain. If necessary, enter "radius.my-wire.de".
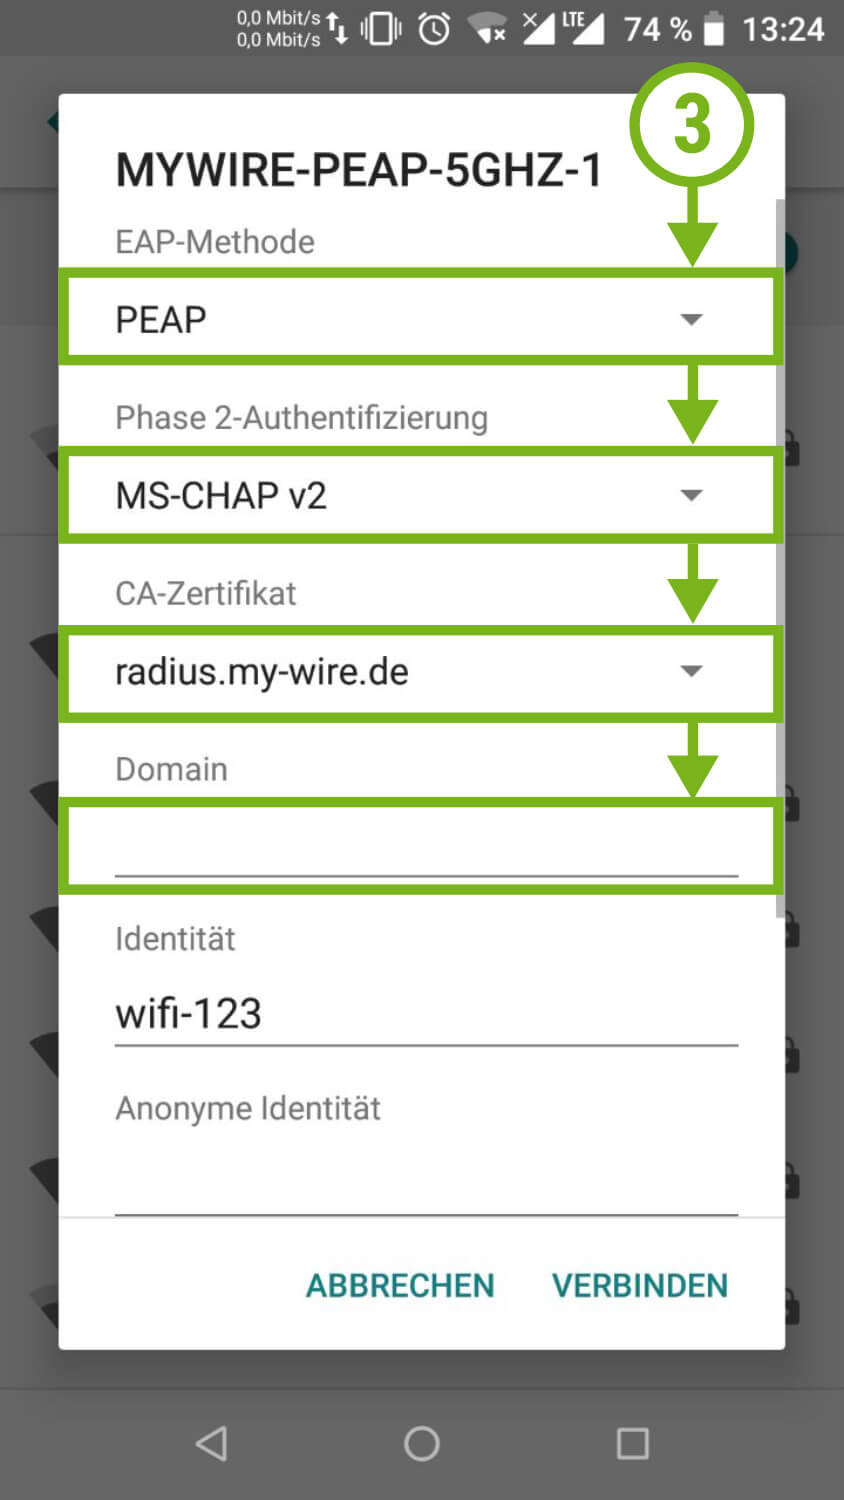
4) Enter your user name for Identity, your password for Password and confirm with Connect. You can then use the WiFi connection.
Please note that a certificate has a validity period. Should this expire, we will automatically provide you with a new certificate. This requires a new setup of the WiFi connection.
5) Note: If you are temporarily unable to download the certificate, you can select "Do not validate" for the CA certificate. However, this means that there is a potential security risk where third parties may be able to read transferred data.
Last updated on 19. Jul 2023
In order to use our "MYWIRE" WiFi networks without problems, it may be necessary to manually set up the WPA2-Enterprise connection, which we would like to explain in this article.
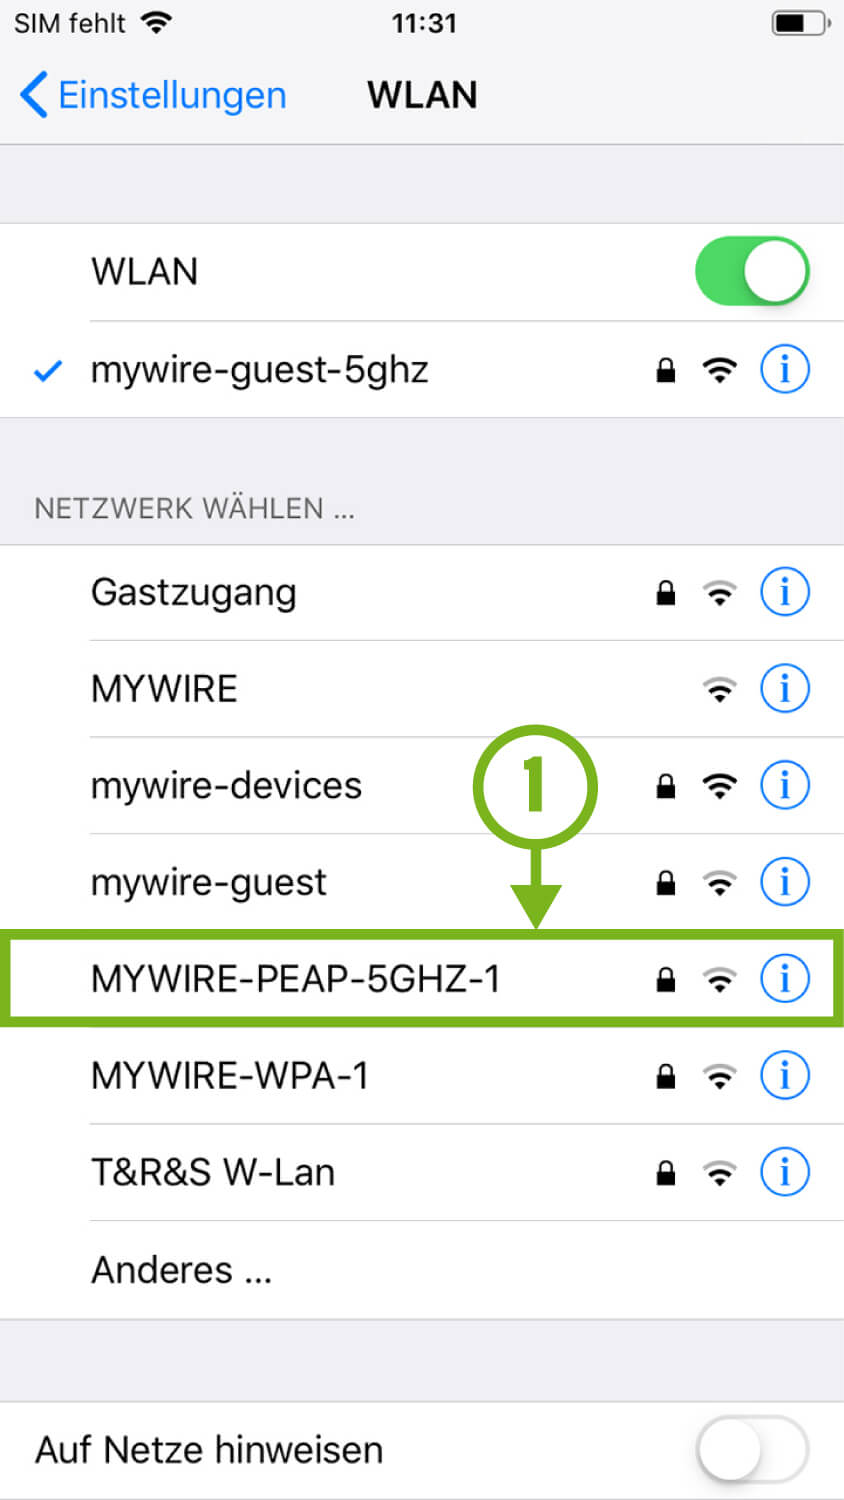
1) Open the WiFi settings in your iPohne and select your "MYWIRE-PEAP" or "MYWIRE-SECURE" network. Information about the different "MYWIRE" WiFi networks and 5GHZ WiFi can be found in our FAQs.
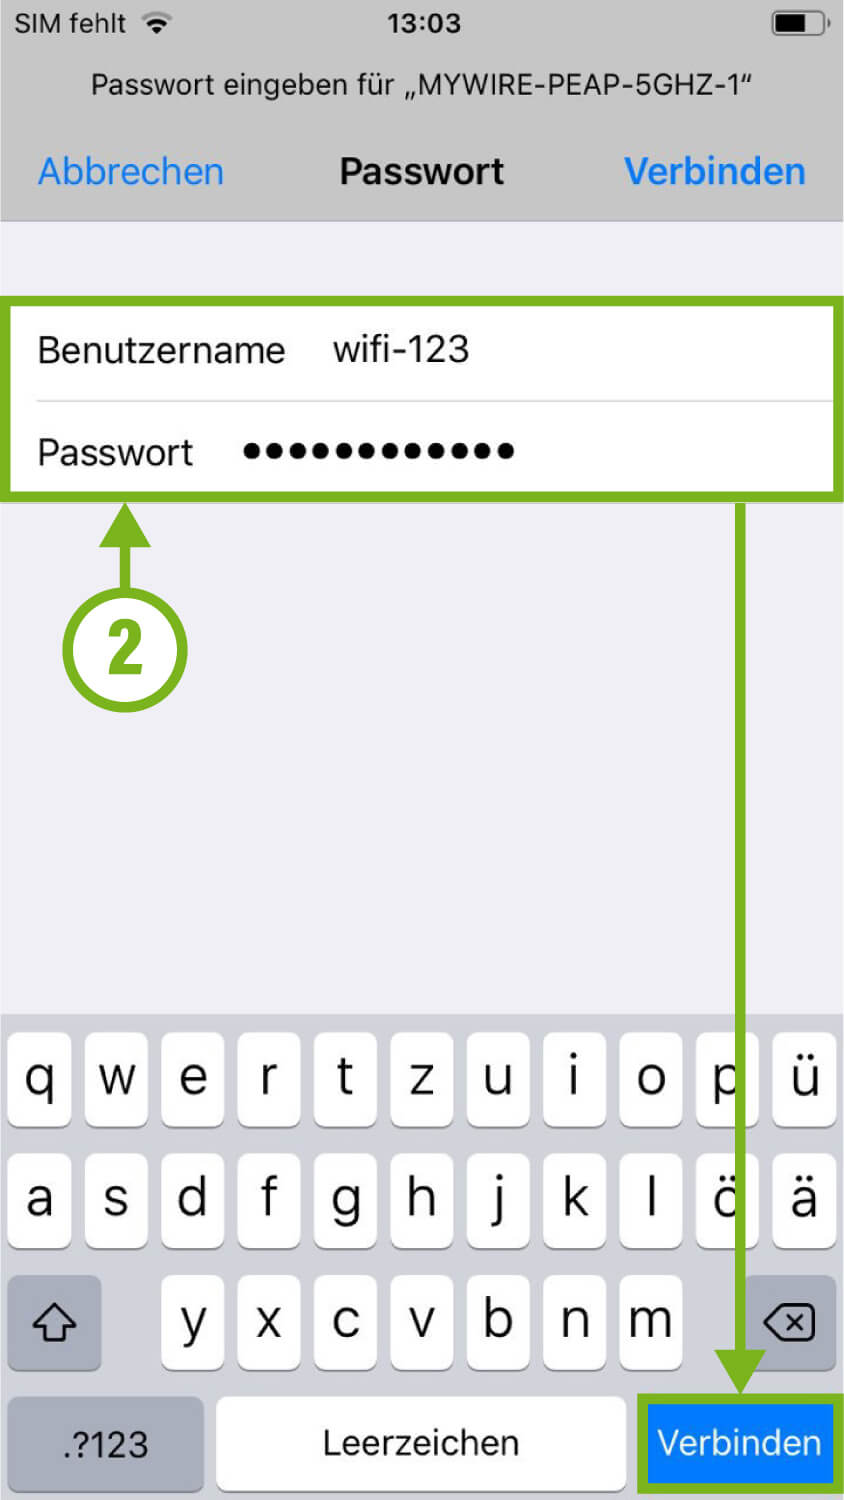
2) Enter your username and password. Then click Connect.
3) In the next step you will see the certificate of our server. You may see this as Untrusted. There may be several reasons for this. Please select "Trust".
Please note that a certificate has a validity period. Should this expire, we will automatically provide you with a new certificate. This requires a new setup of the WiFi connection.
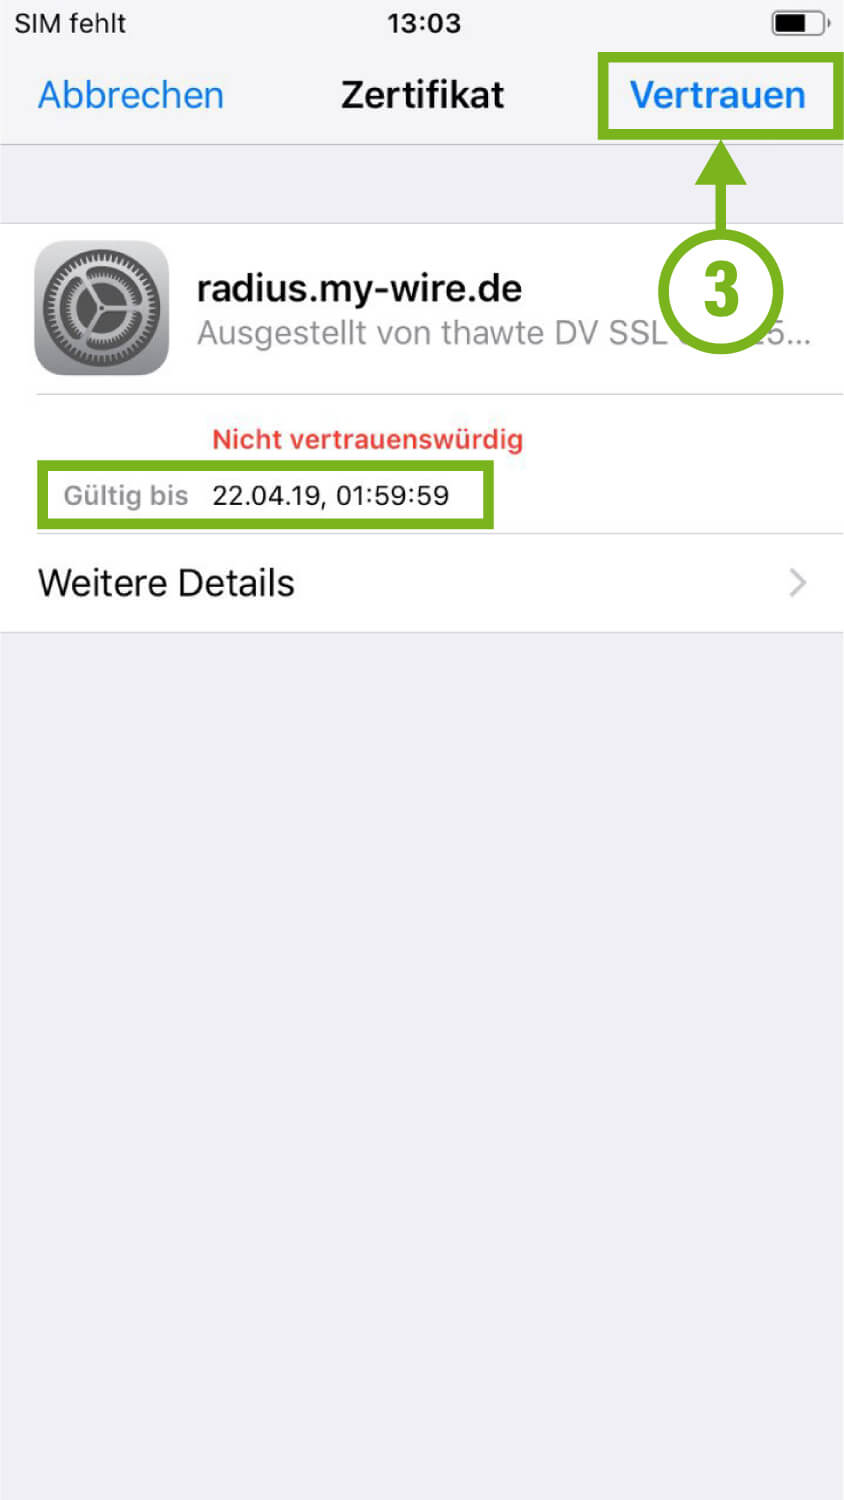
4) You can now use the WiFi connection.
Last updated on 08. Apr 2020
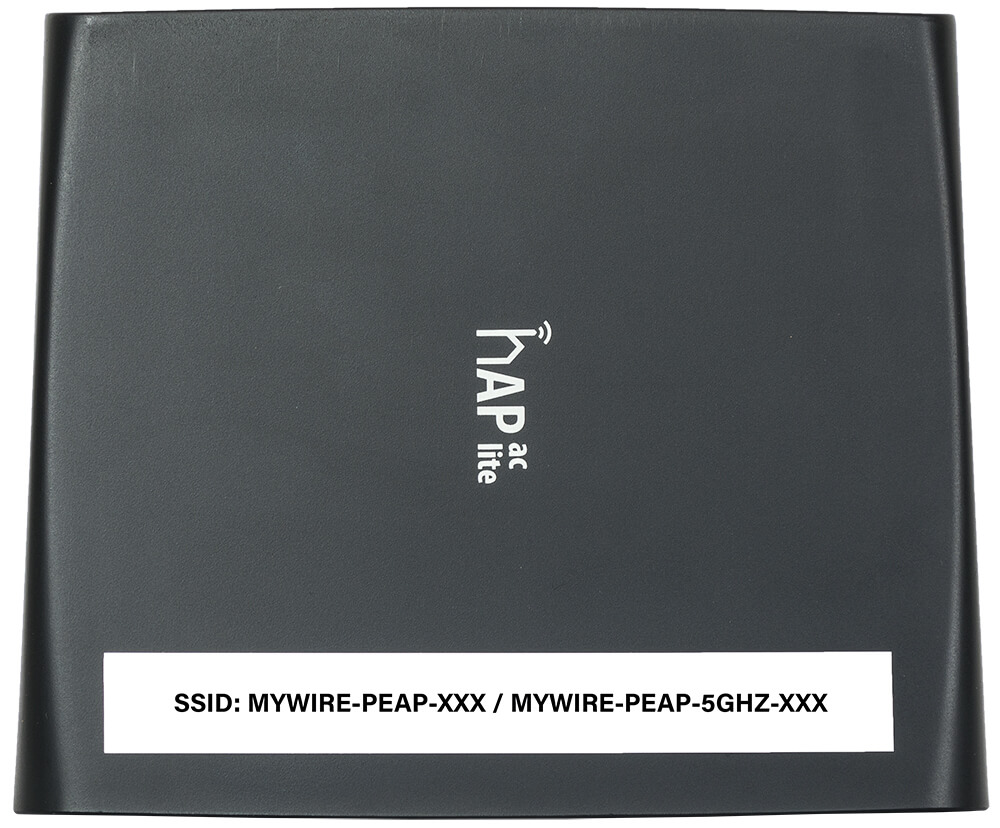
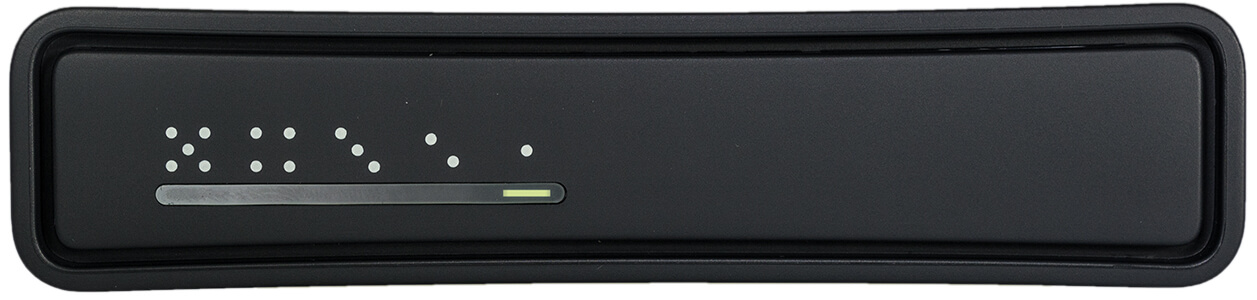
In some residential complexes we offer an area-wide WiFi network. Each room has a WiFi router. The devices are provided with a sticker, on which is printed the name of the emitted network (see picture). The characters "XXX" correspond to a number on your router. Example:
If your end devices cannot find this WiFi network, please proceed as follows:
- First, check the correct connection of the LAN cable to the network socket or cable modem to the router Internet/PoE port.
- Second, check the connection of the power cable to your router. If the power supply is working and plugged in, the LED "pwr" on the rear panel will light up.
- NOTE: In some residential complexes, our routers receive power via the LAN cable (PoE). You can recognize this by the fact that without an extra power cable the LED "pwr" lights up.
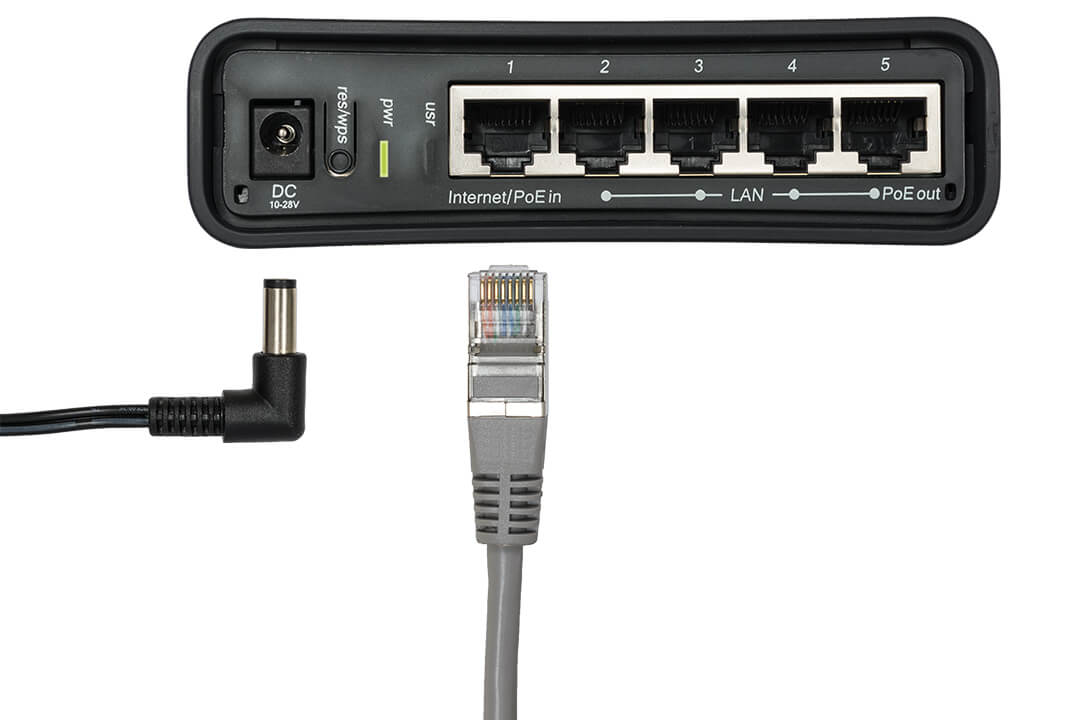
At the front the LED of port 1 will light up. This indicates correct connection. The WiFi network should be detectable about one minute after plugging in.
Note: If your router has been in operation for the first time or has not been in operation for a long time, a software update may be necessary. This is done automatically when the router is plugged in. Please do not disconnect the device from power and Internet immediately, as the software update (and the resumption of the function) can take about 10 minutes. The disconnection from power / Internet during the update can lead to the defect of the router!
If the LED does not light up, please check the following:
- Whether your room has multiple network sockets. In the normal case, only one input is unlocked for the Internet.
- If the router is operated via a cable modem, please check that the cable modem is online and that the following LEDs are lit continuously: Power / Receive (DS) / Send (US) / Online. If the "Link" on the cable modem and the LED for port 1 on the router light up, this indicates that the LAN cable used is functioning correctly.
- Please test another LAN cable. If it is damaged, no connection is possible.
- To check that your apartment Internet connection is working properly, connect your computer directly to the network socket or cable modem using the LAN cable. The cable modem must be disconnected from the power supply once in order to activate a new device. If the Internet connection then works, there is an error on the router.
If this does not solve your problem, please contact our support.
Last updated on 06. Jul 2021
Most likely you are using our WPA2 Enterprise encrypted connection ("MYWIRE-PEAP-XXX") which is not supported by your devices. To still be able to connect these devices via WiFi, you must set up a personal, WPA-encrypted, WiFi network on your router. You can set it up independently on our customer portal at any time: https://portal.my-wire.de
Please note that for security reasons the portal can only be accessed within our own networks. You must therefore be on your Internet connection provided by us in order to be able to set up the portal.
Last updated on 04. Nov 2021
The WiFi networks broadcast are, depending on the supply agreement with your landlord, broadcast either only in public areas or across the board.
To use our WiFi networks, you need login data. You can find out how to obtain them in the corresponding FAQ article. The access data is valid for all MYWIRE networks in the entire dormitory.
WiFi networks differ in terms of technology and security. This can also be seen from the SSID. The SSIDs are as follows: "MYWIRE", "MYWIRE-PEAP", "MYWIRE-SECURE". The network "MYWIRE" is unencrypted! It is only suitable for devices that do not implement a WPA2 Enterprise standard. For standard Internet use, we therefore offer networks that are encrypted with WPA2 Enterprise. These networks have a "PEAP" or "SECURE" in their network name.
In dormitories where we offer WiFi coverage, the following SSIDs are also broadcast: "MYWIRE-PEAP-XXX" or "MYWIRE-SECURE-XXX" and "MYWIRE-PEAP-5GHZ-XXX" or "MYWIRE-SECURE-5GHZ-XXX". The "XXX" stands for a consecutive number of the router that broadcasts the network. It is also printed on the router and is used to connect to a specific router. Please always connect to the network that the router radiates in your apartment.
Note:
WiFi-compatible devices do not always automatically connect to the WiFi network with the best signal quality. The networks "MYWIRE" and "MYWIRE-PEAP" or "MYWIRE-SECURE" are available throughout the house. It may happen that your device selects the signal from a router that may be very far away from you and therefore has a weak signal. This can significantly affect Internet quality and speed.
The explanation of the "-5GHZ-" networks can be found in a separate FAQ article.
Last updated on 08. Apr 2020
In the area of wireless networks ( WiFi ), a distinction is made between two frequency bands: 2.4 GHz and 5 GHz. The 2.4 GHz Wireless LAN standard is an older standard and is widely used. The 5GHz standard became necessary in the context of increasing bandwidths. There are different transmission standards which are used on these frequency bands.
If you receive a "MYWIRE-5GHZ" network in your apartment, you should preferably connect to this network in order to use the most reliable connection and high speeds possible.
Last updated on 08. Apr 2020
TV
In most dormitories, the television signal is fed in via DVB-C (digital cable television standard) and can be received with suitable receivers or television sets. To do this, start the channel search at your device and then check the reception of the various channels.
In individual cases, other feed formats (e.g. DVB-S, satellite television) may be used - our support team will be pleased to answer all your questions about your TV connection.
Last updated on 08. Apr 2020
In case of problems or malfunctions with the TV signal provided by us, please check the following points:
- Is the TV cable connected to the correct socket output and TV input? Normally we supply your dorm via DVB-C via the normal TV socket output. In a few dorm's it is a DVB-S signal via a F connector.
- Is the TV cable tightly connected to the TV socket and to your device?
- In any case, please check whether another TV antenna cable solves the problem or changes the fault image!
- Do you use:
a splitter, junction box, or T-piece for splitting the TV signal into several devices or
a device for processing the TV signal (e.g. DVB-C -> WLAN converter or amplifier)
in the signal path to the television? If this is the case, please test your television directly at the TV socket, without intermediate components in the antenna cable. - Reset the TV to the factory setting and set the country code of the unit to International for tuning. Some devices have country locks and do not search the entire frequency range on which our TV signal is located.
- If possible, please test another TV set on your socket.
Note: In some residential complexes with cable modems, splitters are plugged onto the TV sockets. Please never operate your TV permanently without the splitter on the TV socket - this can impair the signal quality in the entire house. If you notice that the TV signal directly at the socket, i.e. without upstream splitters, does not show any interference, please replace the splitter at the property management.
If this does not solve your problem, please contact our support and inform them that you have already completed the steps in this article. If your TV has a signal strength indicator, please let us know the status of that indicator.
In any case, we need the following information about the malfunction:
- When does the malfunction occur? (Regular at certain times or permanent?)
- Which channels are affected and which are not? (Private, ÖR or e.g. only the RTL group?)
- What's the nature of the interference? (pixel, sound problems, signal dropouts?)
Last updated on 08. Apr 2020
The activation of the internet connection in your apartment takes place via an activation website. Some TV sets may not display this correctly. In most cases, a television can only be operated on the Internet by using a router.
Please connect the router to the Internet connection. The router must always be able to handle DHCP on the WAN port. You then activate your connection once via a terminal device (not via the TV), which is also connected to the router (e.g. via a smartphone or laptop). All devices, including your TV, can then use the Internet via the router.
Last updated on 08. Apr 2020
IPTV
IPTV is available in special dormitories. Please ask your landlord if IPTV is available in your dormitory. You can find more information about our IPTV offer at the following website:
https://iptv.my-wire.de (The site is only accessible from the dormitory network)
Last updated on 26. Apr 2020
Phone
To use a VoIP telphone connection in your dormitory, you need an extra contract with a VoIP provider. We recommend dus.net, with which you can make cost-effective calls via the computer, a VoIP router or a VoIP telephone or adapter! For a quick and uncomplicated introduction to VoIP telephony, we recommend the "DUStel starter" rate. This is a prepaid tariff with second clocking. You can pay with PayPal, credit card, direct debit or bank transfer.
Your advantages of DUStel starter:
- low-cost telephone rates!
- no basic fee!
- no setup fee!
- no minimum contract duration!
Last updated on 23. Feb 2021